Features
- Network and Connectivity Policy
- Application Policy
- Device Function Policy
- Application Setting Policy
- Administrative Policy
- Interaction policy
- Security Policy
- System Update Policy
- Notifications
Network and Connectivity Policy
A Network and Connectivity policy controls how the devices in a device group connect to the outside world:
-
whether Wi-Fi is on, and whether users may turn it off or change Wi-Fi networks
-
which Wi-Fi networks devices may or may not join, and how secure a network must be
-
tethering, USB data transfer, airplane mode, 2G and ultra-wideband radios
-
a global HTTP proxy
-
Wi-Fi networks that are pre-configured on the device, including their passwords
-
which device activity logs are collected and whether they may be uploaded over mobile data
You create the policy once and assign it to one or more device groups. Every device in those groups receives the same settings.
Before You Start
-
Most connectivity settings only work on company-owned devices. Several of them also need a minimum Android version — see Minimum Android version. A device that does not meet the requirement keeps its previous behaviour and is reported as non-compliant for that setting.
-
If you plan to pre-configure Wi-Fi networks, have the network name (SSID), security type and password at hand.
-
Be careful with settings that can cut a device off from the network (turning Wi-Fi off, a strict allowlist, an unreachable proxy). Turning on Escape Hatch Enabled gives users a way to reconnect if that happens.
Where to Find It
Open Policies in the left-hand menu and select Network and connectivity. The enterprise home page also has a Network and Connectivity card that leads to the same list.
The list shows every policy in the enterprise with its Display name, the Assigned Device Groups and the Min Android version it requires. Use the Name filter and Search to narrow the list, and the page controls above and below the table to move between pages.
How to Create a Policy
-
Open Policies → Network and connectivity.
-
Select Create, then Create new +. (To start from a saved template, select Create from template + instead — see Templates.)
-
Enter a Description Name. This is required and must be unique within the enterprise.
-
Fill in the General, Network Access, Proxy and Wi-Fi Policies sections. Every dropdown starts as Unspecified, which means "do not manage this setting" — the device keeps its default behaviour. Only change the settings you actually want to enforce.
-
If devices should have Wi-Fi networks ready to use, add them under Network Configurations — see Network Configurations.
-
Select Save.
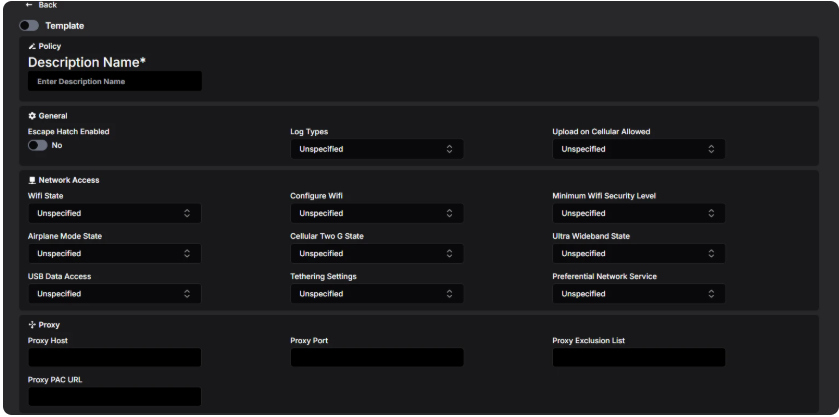
If something is wrong, an error message appears at the top of the page and the policy is not saved. See Troubleshooting for the most common messages.
What Happens Next?
The new policy appears in the list. It does nothing until you assign it to a device group — see Assigning the Policy to a Device Group.
Settings Reference
The option names below are exactly what the dropdowns show.
General
Setting
What it does
Escape Hatch Enabled
When Yes, a device that cannot reach any network when it starts up asks the user to connect to a network temporarily so it can fetch its latest policy. The temporary network is forgotten afterwards. Recommended for devices locked to a single app, where the user cannot otherwise reach the settings. Note: if Configure Wifi is set to DisallowConfiguringWifi, the escape hatch is shown regardless of this setting when the device has no network at start-up.
Log Types
Which activity logs the device collects. You can select both SecurityLogs (for example wrong password attempts, removable storage mounted) and NetworkActivityLogs (DNS lookups and network connections). Users see a notice on the device when logging is enabled. Security logs need Android 7 or later, network logs Android 8 or later; on company-owned devices with a work profile both need Android 12 or later and only cover the work profile.
Upload on Cellular Allowed
Which of the enabled log types may be uploaded over mobile data. By default logs wait until the device is on Wi-Fi.
Network Access
Setting
Options and effect
Wifi State
WifiStateUserChoice (default): the user may turn Wi-Fi on and off. WifiEnabled: Wi-Fi is on and cannot be turned off. WifiDisabled: Wi-Fi is off and cannot be turned on. Enabled/Disabled need company-owned devices on Android 13 or later.
Configure Wifi
AllowConfiguringWifi (default): the user may add, change and remove Wi-Fi networks. DisallowAddWifiConfig: the user can only switch between networks that already exist on the device (Android 13 or later). DisallowConfiguringWifi: the user cannot add, change or remove networks at all. On fully managed devices this also removes every network from the device except the ones listed under Network Configurations; on work profiles the existing networks stay but cannot be changed.
Minimum Wifi Security Level
The weakest network the device may join. OpenNetworkSecurity (default): any network, including open ones. PersonalNetworkSecurity: a password-protected network (WEP, WPA2-PSK) at minimum — no open networks. EnterpriseNetworkSecurity: enterprise (EAP) networks only. EnterpriseBit192NetworkSecurity: 192-bit enterprise networks only. Anything stricter than Open needs Android 13 or later.
Airplane Mode State
AirplaneModeUserChoice (default): the user may toggle airplane mode. AirplaneModeDisabled: airplane mode is off and cannot be turned on (Android 9 or later).
Cellular Two G State
CellularTwoGUserChoice (default): the user may toggle 2G. CellularTwoGDisabled: 2G is off and cannot be turned on from settings (Android 14 or later).
Ultra Wideband State
UltraWidebandUserChoice (default): the user may toggle ultra-wideband. UltraWidebandDisabled: ultra-wideband is off and cannot be turned on from settings (Android 14 or later).
USB Data Access
Controls data over the USB port; charging is never affected. AllowUsbDataTransfer: everything allowed. DisallowUsbFileTransfer (default when Unspecified): file transfer is blocked, but accessories such as a mouse or keyboard still work. DisallowUsbDataTransfer: all USB data is blocked (Android 12 or later with suitable hardware; older or incompatible devices fall back to blocking file transfer only). Company-owned devices only.
Tethering Settings
AllowAllTethering (default): all forms of tethering and hotspot are allowed. DisallowWifiTethering: Wi-Fi hotspot is blocked, other tethering allowed (company-owned devices on Android 13 or later). DisallowAllTethering: no tethering of any kind.
Preferential Network Service
Whether work traffic uses a network service dedicated to enterprise use, such as an enterprise slice on a 5G network, when your carrier provides one. PreferentialNetworkServiceDisabled is the default. PreferentialNetworkServiceEnabled needs a work profile on Android 12 or later, or a fully managed device on Android 13 or later.
Proxy
A device-wide HTTP proxy recommendation. Leave all four fields empty if you do not use a proxy.
Setting
What to enter
Proxy Host
Host name or address of the proxy server.
Proxy Port
Port of the proxy server.
Proxy Exclusion List
Hosts that bypass the proxy, separated by commas. Wildcards such as *.example.com are allowed.
Proxy PAC URL
Address of a PAC (proxy auto-configuration) script.
Use either the direct proxy fields (Host, Port, Exclusion List) or the PAC URL, never both — the policy cannot be saved otherwise.
Keep in mind that the proxy is a recommendation: some apps ignore it, and if the proxy cannot be reached the device may lose network access.
Wi-Fi Policies
This section restricts which Wi-Fi networks a device may connect to. It does not change which networks are stored on the device — use Configure Wifi for that.
Setting
Options and effect
Setting
Options and effect
Wifi SSID Policy Type
Unspecified: no restriction — the SSID list must be left empty. WifiSsidDenylist: the device may join any network except the ones listed. WifiSsidAllowlist: the device may join only the listed networks — the list must contain at least one name.
Wifi SSIDs
The network names the rule applies to. Type a name and press Enter or , to add it; select × on a name to remove it. Any non-empty list needs a company-owned device on Android 13 or later.
Wifi Direct Settings
AllowWifiDirect (default) or DisallowWifiDirect, which stops the user from using Wi-Fi Direct (company-owned devices on Android 13 or later).
Network Configurations
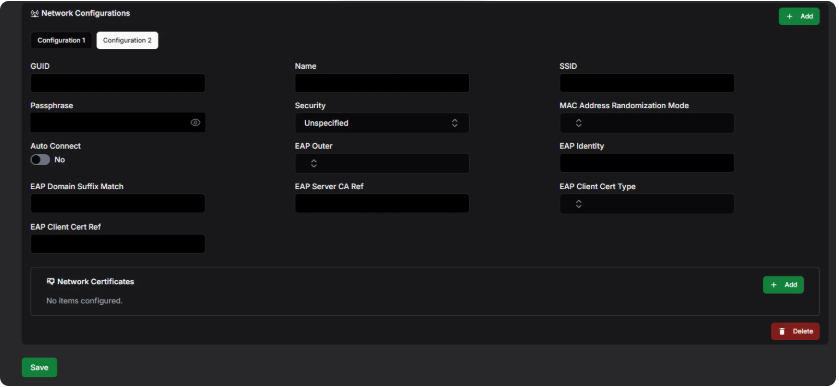
Each entry is a Wi-Fi network that the device knows about without the user having to enter anything. The network is pushed to the device together with its password.
-
Select Add in the Network Configurations section. A new tab (Configuration 1, Configuration 2, …) appears; the tab takes the network's Name once you enter one.
-
Fill in the fields below.
-
To remove the configuration shown, select Delete at the bottom right of the section.
Field
What to enter
GUID
An identifier you choose for this network. It must be unique within the policy; certificates refer to it.
Name
A display name for the network.
SSID
The network name exactly as the access point broadcasts it.
Passphrase
The network password. Required for WepPsk, WpaPsk and Wep8021x; must be left empty for Unspecified, WpaEap and Wpa3Enterprise192. A WEP key must be exactly 10 or 26 characters. Select the eye icon to show what you typed. After saving, the password is stored securely and only shown as ********.
Security
Unspecified: an open network with no password. WepPsk, WpaPsk: a personal network with a shared password. WpaEap, Wep8021x, Wpa3Enterprise192: enterprise networks that authenticate with certificates — see the note below.
MAC Address Randomization Mode
Hardware: the device uses its factory MAC address. Automatic: the device decides. Leave empty to keep the device default. Android 13 or later.
Auto Connect
Yes: the device joins the network automatically when in range. No: the user must pick the network once before it connects automatically.
EAP Outer, EAP Identity, EAP Domain Suffix Match, EAP Server CA Ref, EAP Client Cert Type, EAP Client Cert Ref
Enterprise (EAP) authentication details. For WpaEap and Wpa3Enterprise192 all six are required together with at least one certificate. EAP Domain Suffix Match takes one or more domain suffixes separated by commas, each containing a dot (for example corp.example.com); Wpa3Enterprise192 always needs one. EAP Server CA Ref and EAP Client Cert Ref are the GUIDs of certificates you add under Network Certificates. EAP Client Cert Type is Ref (a certificate in this policy) or KeyPairAlias (a key pair already installed on the device, Android 12 or later).
Enterprise Wi-Fi is not yet delivered to devices. The EAP fields and certificates are validated and saved with the policy, but the current release does not push them to devices, so an enterprise (EAP) network configured here will not connect. Personal (password) and open networks work normally.
Network Certificates
Certificates belong to a network configuration and are added inside it. Select Add in the Network Certificates box, fill in the fields, and select Delete to remove the selected certificate.
Field
What to enter
Description
A name for the certificate, at least 3 characters.
GUID
An identifier you choose. Use it in EAP Server CA Ref or EAP Client Cert Ref.
Type
Cert
The certificate data.
Format
X509 for a certificate without a private key, Pkcs12 for a client certificate bundled with its key.
Viewing and Editing a Policy
-
In the policy list, select the eye button on the row you want to open.
-
If the policy is in use, Assigned to: at the top lists the device groups; each name is a link to that group.
-
Select Edit.
-
Change the settings. Select Save to keep the changes or Cancel to discard them.
Notes on editing:
-
Existing network configurations cannot be changed. To alter a network, delete its configuration and add a new one with the new values. Certificates can only be added to or removed from a new configuration.
-
The saved password of an existing configuration is never shown again.
-
Devices receive the updated settings through the device groups the policy is assigned to.
Copying a Policy
Copying is the quickest way to create a variant of an existing policy.
-
Select the copy button — either on the row in the list or at the bottom of an open policy.
-
In Enter display name for new copy, type a name of at least 3 characters.
-
Select Copy.
The copy contains every setting, network configuration and certificate of the original. When you copy from an open policy, the copy is opened for you.
Templates
A template is a policy saved for reuse; it is not assigned to devices itself.
Saving a template (Admin or Editor role only):
-
Open Create → Create new +.
-
Turn on the Template switch above the form.
-
Fill in the settings and select Save.
Creating a policy from a template:
-
Open Create → Create from template +.
-
In Select a Template, select Create + next to the template you want.
-
The form opens pre-filled. Enter a Description Name, adjust the settings and select Save.
Admins can remove a template with the trash button in the same dialog.
Deleting a Policy
-
In the policy list, select the trash button on the row.
-
Confirm with Delete in the Confirm deletion dialog.
A policy that is still assigned to a device group cannot be deleted. Remove it from the group first.
Assigning the Policy to a Device Group
-
Open Device Groups and create a group or open an existing one.
-
In Network and Connectivity Policy, select the policy.
-
Save the group.
A device group can have one Network and Connectivity policy; a policy can be used by any number of groups. The Network and Connectivity column in the device group list shows which policy each group uses.
Minimum Android Version
Each policy shows a Min Android value in the list. It is calculated from the strictest option you selected and tells you the oldest Android version a device needs in order to apply everything in the policy. Devices running an older version keep their previous behavior for the settings they do not support.
| Selection | Requires Android |
| Nothing beyond the defaults | 6 |
| Airplane Mode State = AirplaneModeDisabled | 9 |
| USB Data Access = DisallowUsbDataTransfer | 12 |
| Wifi State = WifiEnabled or WifiDisabled | 13 |
| Configure Wifi = DisallowAddWifiConfig | 13 |
| Minimum Wifi Security Level stricter than Open | 13 |
| Tethering Settings = DisallowWifiTethering | 13 |
| Wifi Direct Settings = DisallowWifiDirect | 13 |
| Any Wifi SSIDs listed | 13 |
| Cellular Two G State = CellularTwoGDisabled | 14 |
| Ultra Wideband State = UltraWidebandDisabled | 14 |
Application Policy
An Application policy controls a single app on the devices in a device group:
-
how the app gets on the device — installed automatically, offered for installation, blocked, or delivered as your own uploaded APK
-
whether the user can remove or disable it, and whether its permissions are granted automatically
-
how the app updates, and constraints for the installation (network, charging, idle)
-
a managed configuration that pre-fills the app's own settings
-
special roles such as running the device as a kiosk
You create one Application policy per app, and attach the policies to device groups. Every device in those groups receives the same app setup.
Before You Start
-
You need the Admin, Editor, Enterprise Admin or Enterprise Editor role to create, edit, copy or delete policies. Viewers can only open and read them.
-
The app itself must already exist in the enterprise — approved from managed Google Play, or uploaded as a custom APK — so that it appears under Applications → Application List. Only apps from that list can be selected in a policy.
-
If you want to pre-fill the app's settings, create the managed configuration for the app first under Managed Configurations.
-
Some options need a minimum Android version — the policy list shows the computed Min Android value for each policy.
Where to Find It
Open Policies in the left-hand menu and select Application.
The list shows every application policy with its Display name, Package, Assigned Device Groups, Disabled state and Min Android version. Filter by Name or Package and select Search; Advanced search adds filters for Disabled and Install Type. Each row has view, copy and delete buttons.
How to Create a Policy
-
Open Policies → Application.
-
Select Create, then Create new + (or Create from template + to start from a template — see the Policy Templates manual).
-
Enter a Description Name. This is required and must be unique within the enterprise.
-
In General, choose the Application. Until you do, the other sections stay empty and the page shows Select application first.... The choice is locked afterwards — a policy always belongs to one app.
-
Fill in the sections described under Settings Reference below. Which fields are available depends on the chosen app and the Install Type; fields that do not apply are shown crossed out and cannot be edited.
-
Optionally pick a Managed Configuration and set per-permission overrides under Permissions (overrides default).
-
Select Save. Reset clears the whole form and starts over.
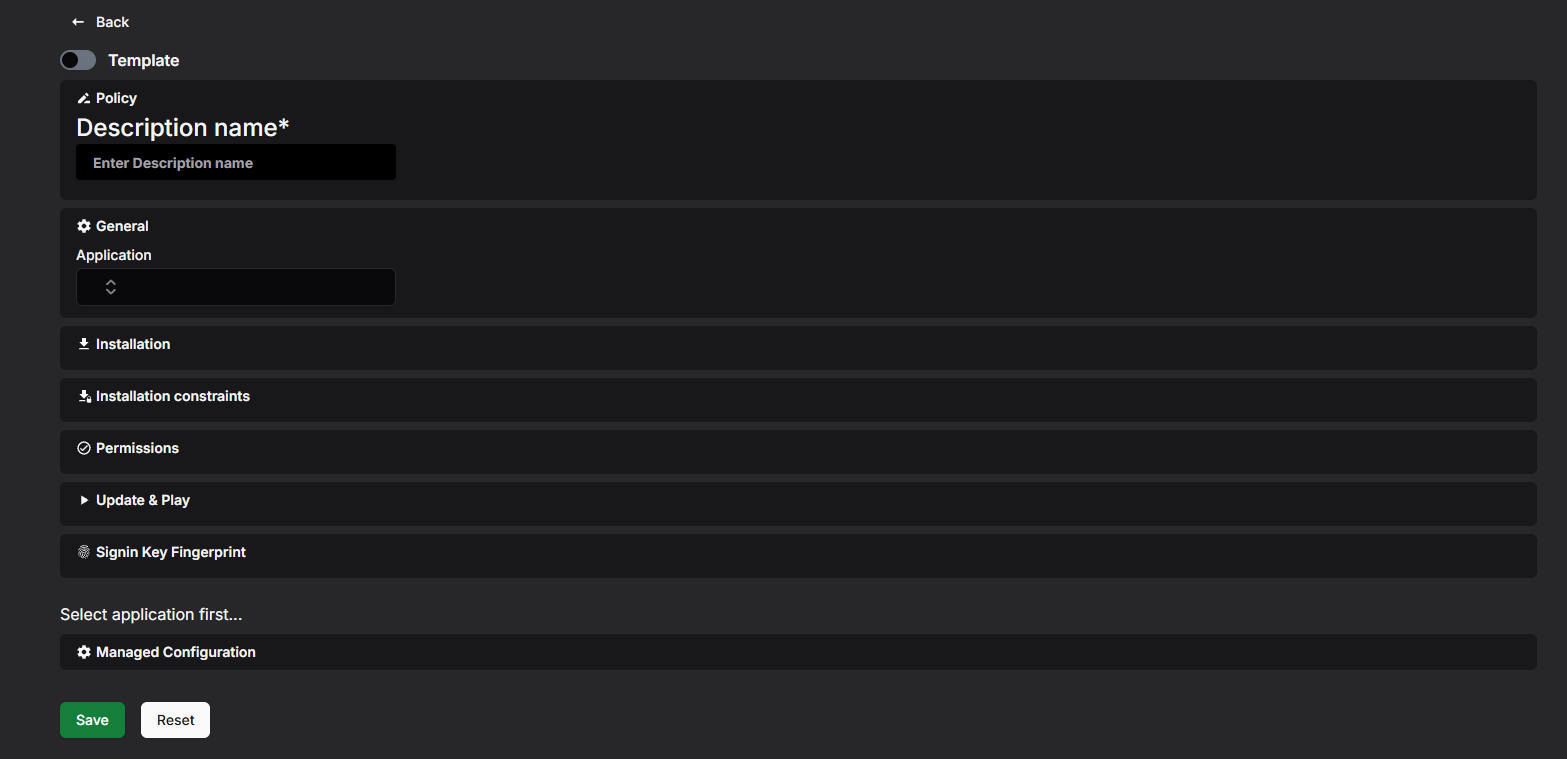
If something is wrong, an error message appears at the top of the page and the policy is not saved. See Troubleshooting at the end for the most common messages.
What Happens Next?
The new policy appears in the list. It does nothing until you assign it to a device group — see Assigning the Policy to a Device Group further down.
Settings Reference
The option names below are exactly what the dropdowns show.
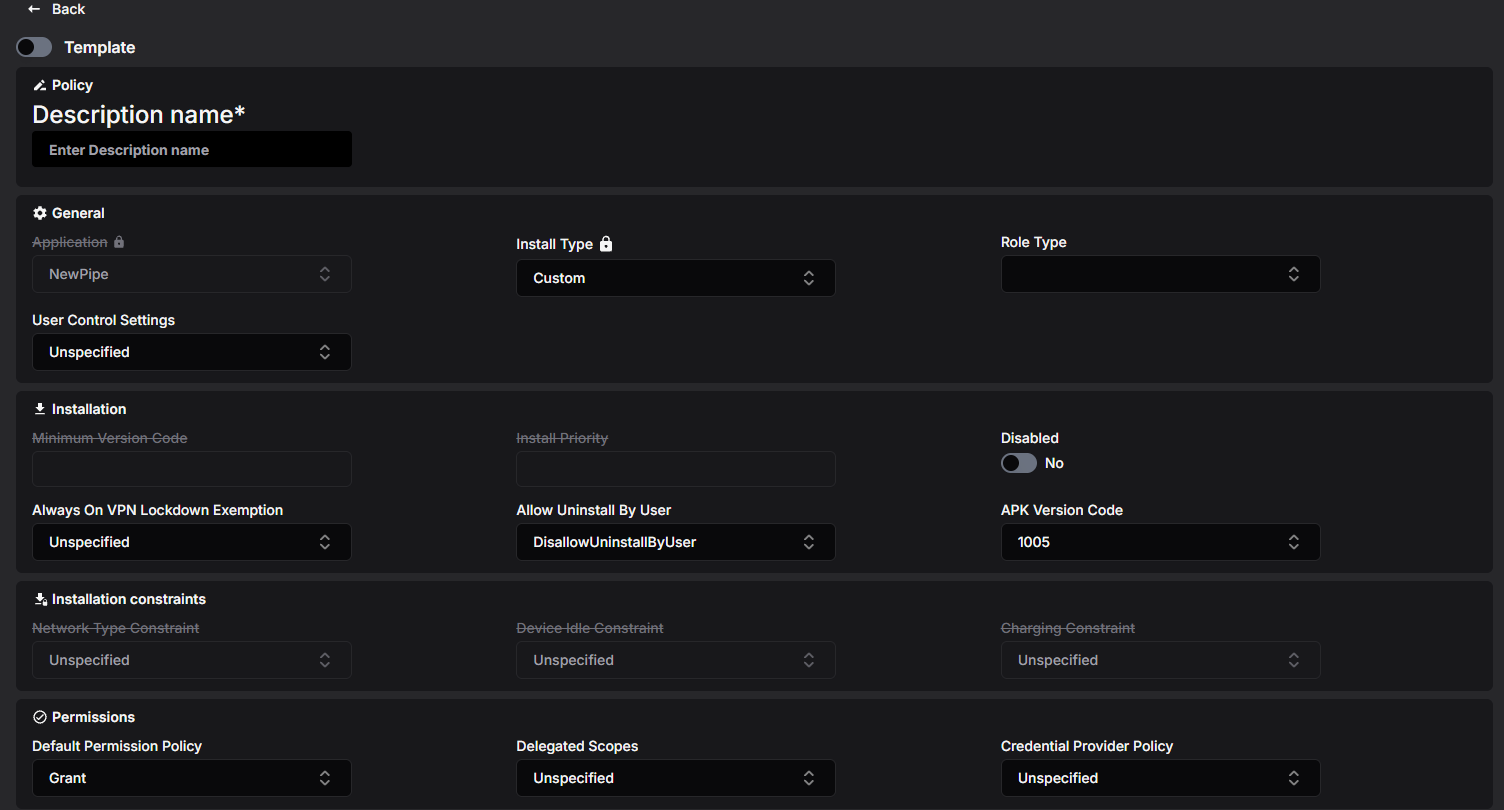
General
Application
The app this policy is about, chosen from the apps in Application List. Locked once selected.
The device management client app is special: when you select it, its role and install type are fixed and cannot be changed.
Install Type
How the app is delivered to the device:
-
Available (default) — the user may install the app from the managed Google Play store.
-
PreInstalled — the app is installed automatically, and the user may remove it.
-
ForceInstalled — the app is installed automatically and the user cannot remove it.
-
RequiredForSetup — the app is installed automatically, cannot be removed, and device setup does not finish until it is installed.
-
Blocked — the app cannot be installed; if it is already on the device, it is uninstalled.
-
Custom — the app is your own uploaded APK, delivered outside Google Play. For an uploaded custom app this is the only choice and is locked; the Play-related fields (minimum version, update mode, tracks, install priority and installation constraints) do not apply. Custom apps work on fully managed devices only.
Role Type
Special roles for the app. You can select several, but only one app in a device group's policies can hold a given role:
-
Kiosk — the app becomes the device's home screen and the device is locked to it; the status bar is disabled. Selecting this switches the Install Type to RequiredForSetup automatically (a custom app keeps Custom). On Android 11 and later, a kiosk also blocks user control (force-stop, clearing data) for every app unless you allow it per app with User Control Settings.
-
CompanionApp — the app works together with the device management software and can keep operating offline. On Android 14 and later it is exempt from battery and background restrictions; users cannot force-stop it or clear its data.
-
SystemHealthMonitoring — for system health monitoring apps. On Android 14 and later the app is exempt from battery and background restrictions; users cannot force-stop it or clear its data.
User Control Settings
Whether the user may force-stop the app and clear its data:
-
Unspecified (default) — the app's normal behaviour: allowed for most apps, blocked for kiosk and companion apps.
-
UserControlAllowed — user control is allowed. Only valid together with the Kiosk role; the other roles always block it.
-
UserControlDisallowed — user control is blocked. Android 11 or later.
Installation
Minimum Version Code
The lowest app version allowed on the device; the device updates the app to at least this version. The version must already be published on Google Play. Not available for custom apps.
Install Priority
Order of installation among the apps that install automatically. Only available for ForceInstalled and PreInstalled apps. 0 (the default) means no priority; values 1–10000 install sooner the lower they are.
Disabled
When Yes, the app is disabled on the device but its data is kept. Use this to switch an app off temporarily without uninstalling it.
Always On VPN Lockdown Exemption
What happens to this app when the device uses an always-on VPN in lockdown mode and the VPN is not connected:
-
VpnLockdownEnforced (default) — the app gets no network access.
-
VpnLockdownExemption — the app may use the network anyway. Android 10 or later.
Allow Uninstall By User
For custom apps only: DisallowUninstallByUser (default for an uploaded app) or AllowUninstallByUser.
APK Version Code
For custom apps only: which uploaded version of the APK is delivered. The newest uploaded version is selected automatically. Changing it also reloads the permission list in Permissions (overrides default), so re-check your selections there.
Installation constraints
Conditions the device waits for before installing the app. Only available for ForceInstalled and PreInstalled apps.
-
Network Type Constraint — InstallOnAnyNetwork (default) or InstallOnlyOnUnmeteredNetwork (for example Wi-Fi, to avoid mobile data charges).
-
Device Idle Constraint — DeviceIdleNotRequired (default) or InstallOnlyWhenDeviceIdle (wait until the device is not being used).
-
Charging Constraint — ChargingNotRequired (default) or InstallOnlyWhenCharging.
Permissions
Default Permission Policy
What happens when this app asks for a permission (location, camera, and so on):
-
Grant — permissions are granted automatically. On Android 12 and later, location, camera, microphone and other sensor permissions can only be granted automatically on fully managed devices.
-
Prompt — the user is asked.
-
Deny — permissions are denied automatically.
Individual permissions can be overridden in Permissions (overrides default) at the bottom of the page.
Delegated Scopes
Extra management privileges handed to this app. You can select several: for example CertInstall (install and manage certificates), ManagedConfigurations (manage other apps' configurations), BlockUninstall, PermissionGrant, PackageAccess, EnableSystemApp, NetworkActivityLogs, SecurityLogs and CertSelection. The log and certificate-selection scopes can be held by only one app at a time; network logs need Android 10 or later and security logs Android 12 or later. Grant these only to apps you trust — they give the app real control over the device.
Credential Provider Policy
CredentialProviderAllowed lets the app act as a credential (password/passkey) provider on Android 14 and later. Leave Unspecified to use the device default.
Update & Play
Not available for custom apps.
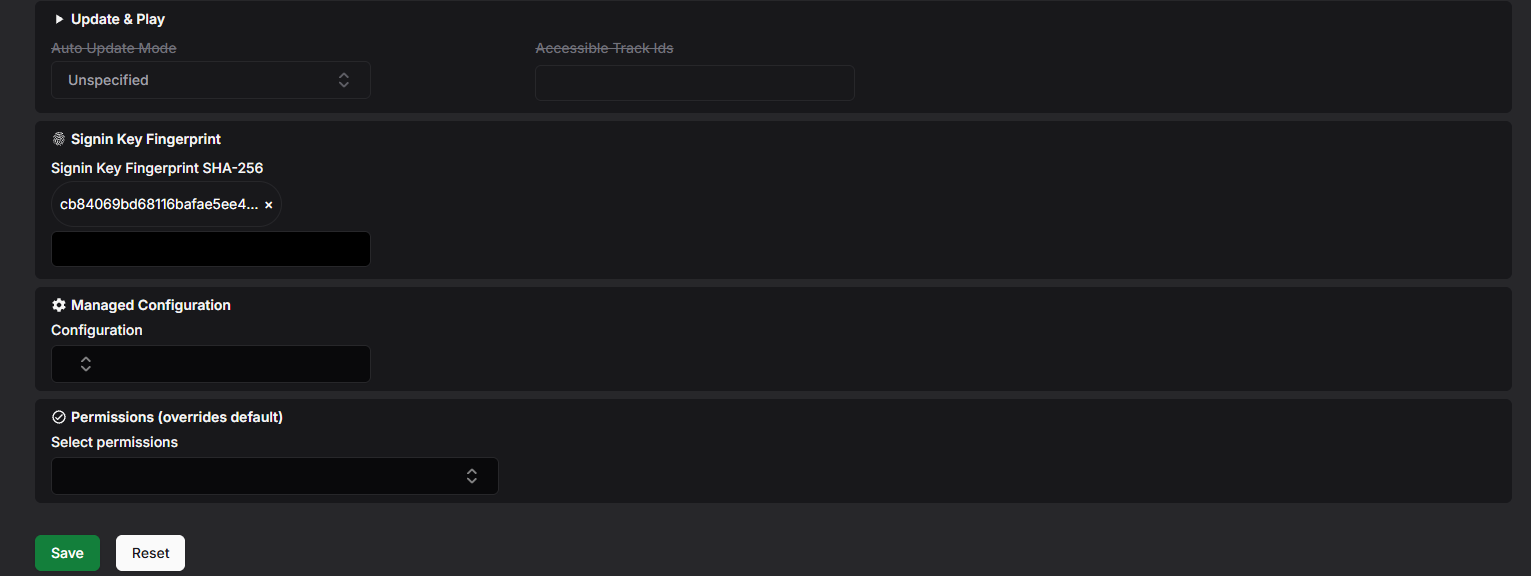
Auto Update Mode
-
AutoUpdateDefault — the app updates with low priority: when the device is idle, charging and on an unmetered network, and the app is not in the foreground.
-
AutoUpdatePostponed — the app is not auto-updated for up to 90 days after it becomes out of date; the user can still update it manually from Play.
-
AutoUpdateHighPriority — the app updates as soon as possible after a new version is available.
Accessible Track Ids
Google Play track IDs (for example internal or beta test tracks) the devices may receive this app from. Type an ID and press Enter or , to add it. Left empty, devices only get the production track.
Signin Key Fingerprint
Signin Key Fingerprint SHA-256 holds the SHA-256 fingerprints of the app's signing certificate. For a custom app they are filled in automatically from the uploaded APK, and a custom app cannot be saved without one. The device checks the installed app against these fingerprints. For Play apps the field is not editable.
Managed Configuration
Pre-filled settings for the app, chosen from the managed configurations created for this app under Managed Configurations. Pick one in the Configuration dropdown. If the configuration contains placeholder values (written as %placeholder%), an input appears for each placeholder so you can fill in the policy-specific value.
A managed configuration cannot be picked while saving the policy as a template.
Permissions (overrides default)
Per-permission exceptions to the Default Permission Policy. This section appears once the app is selected and its permissions are known.
-
Open Select permissions and tick the permissions you want to override.
-
For each selected permission, choose Grant, Prompt or Deny.
Viewing and Editing a Policy
-
In the policy list, select the eye button on the row you want to open.
-
If the policy is in use, Assigned to: at the top lists the device groups; each name is a link to that group.
-
Select Edit.
-
Change the settings. Select Save to keep the changes or Cancel to discard them.
The Application cannot be changed afterwards — create a new policy for a different app. Devices receive the updated settings through the device groups the policy is assigned to.
Copying a Policy
-
Select the copy button — either on the row in the list or at the bottom of an open policy.
-
In Enter display name for new copy, type a name of at least 3 characters.
-
Select Copy.
The copy keeps the app, all settings, the managed configuration choice and the permission overrides. When you copy from an open policy, the copy is opened for you.
Templates
Administrators can save a policy as a global template with your organisation's preferred settings, and anyone can start a new policy from one with Create → Create from template +. See the Policy Templates manual. Note that a managed configuration cannot be included in an application policy template.
Deleting a Policy
-
In the policy list, select the trash button on the row.
-
Confirm with Delete in the Confirm deletion dialog.
A policy that is still in use cannot be deleted. Remove it from the device groups that use it first.
Assigning the Policy to a Device Group
-
Open Device Groups and create a group or open an existing one.
-
Add the policy in the Applications selection.
-
Save the group.
A device group can use many application policies — one per app — and the same policy can be used by any number of groups.
Minimum Android Version
Each policy shows a Min Android value in the list — the oldest Android version a device needs in order to apply everything in the policy:
-
Nothing beyond the defaults — Android 6
-
User Control Settings = UserControlDisallowed — Android 11
Individual options may additionally behave differently on older devices, as noted in the settings reference above.
Device Function Policy
A Device Function policy controls everyday device features on the devices in a device group:
-
connectivity features such as Bluetooth, VPN and mobile network settings, data roaming and NFC sharing
-
location services and location sharing
-
phone calls and SMS messages
-
security-related features such as the microphone, USB file transfer and credential settings
-
screen behaviour while charging, printing, date and time settings, and a message shown on the lock screen
You create the policy once and assign it to one or more device groups. Every device in those groups receives the same settings.
Before You Start
-
You need the Admin, Editor, Enterprise Admin or Enterprise Editor role to create, edit, copy or delete policies. Viewers can only open and read them. See User Roles in the manual index.
-
Most settings work on any managed device, but a few apply only to fully managed devices or need a minimum Android version — these are noted in the settings reference below. The policy list shows the computed Min Android value for each policy.
Where to Find It
Open Policies in the left-hand menu and select Device Function.
The list shows every policy in the enterprise with its Display name, the Assigned Device Groups and the Min Android version it requires. Use the Name filter and Search to narrow the list, and the page controls above and below the table to move between pages. Each row has view, copy and delete buttons.
How to Create a Policy
-
Open Policies → Device Function.
-
Select Create, then Create new + (or Create from template + to start from a template — see the Policy Templates manual).
-
Enter a Description Name. This is required and must be unique within the enterprise.
-
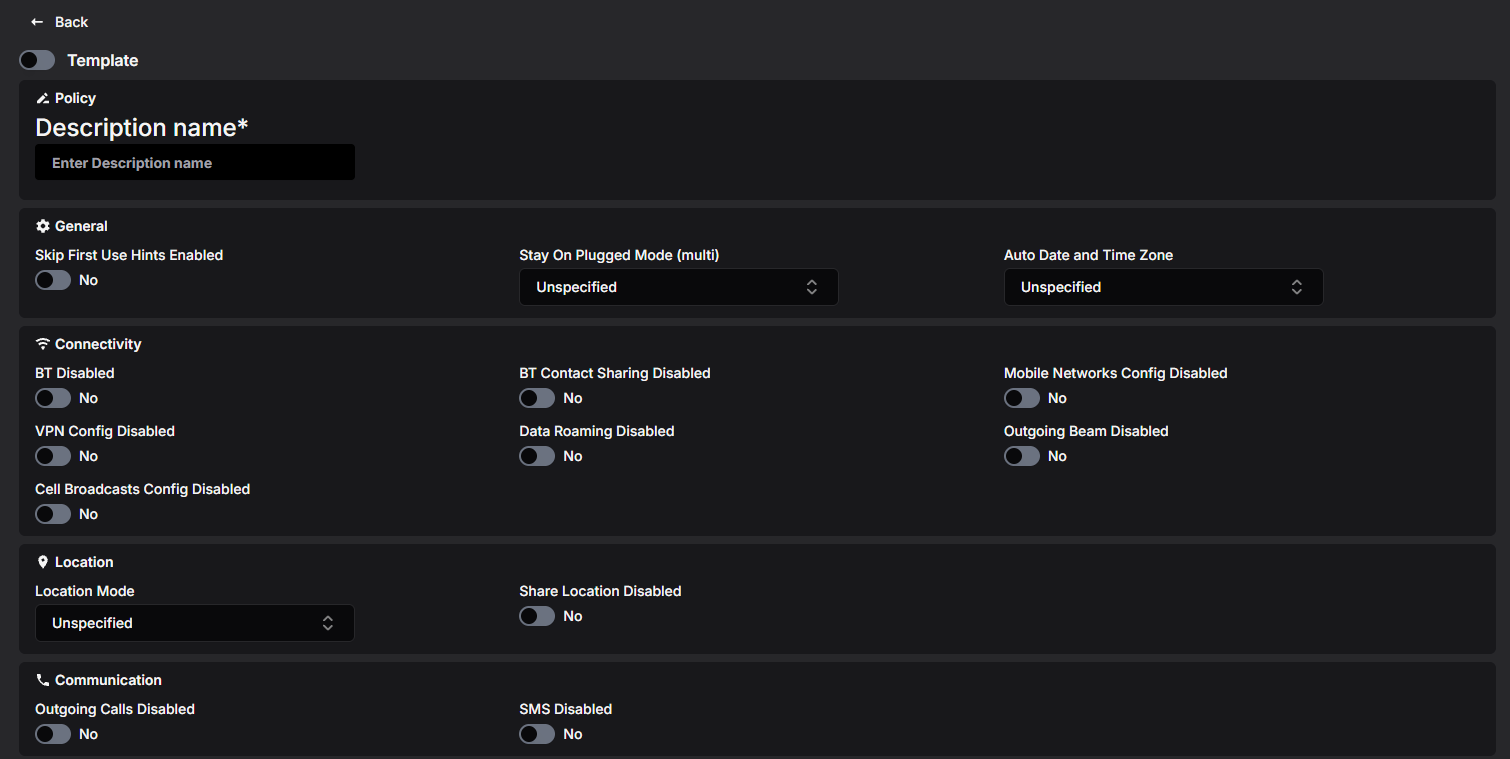
Go through the sections described under Settings Reference below. Every switch starts as No and every dropdown as Unspecified, which means "do not manage this setting" (except Location Mode) — the device keeps its default behaviour. Only change the settings you actually want to enforce.
-
Optionally add a lock screen message — see Lock Screen Info below.
-
Select Save.
If something is wrong, an error message appears at the top of the page and the policy is not saved. See Troubleshooting at the end for the most common messages.
What Happens Next?
The new policy appears in the list. It does nothing until you assign it to a device group — see Assigning the Policy to a Device Group further down.
Settings Reference
Most settings are switches: No leaves the feature alone, Yes disables or enforces it as described. The option names below are exactly what the dropdowns show.
General
Skip First Use Hints Enabled
When Yes, the device recommends that apps skip their user tutorials and other introductory hints on first start-up. Useful for kiosk and single-purpose devices where the hints only get in the way.
Stay On Plugged Mode (multi)
Keeps the screen on while the device is connected to the selected power sources. You can select several: AC (charger), USB and Wireless. Leave unselected to let the screen turn off normally.
Auto Date and Time Zone
-
AutoDateAndTimeZoneUserChoice (default) — the user controls automatic date, time and time zone.
-
AutoDateAndTimeZoneEnforced — automatic date, time and time zone are forced on; the user cannot set them manually.
Connectivity
-
BT Disabled — turns Bluetooth off entirely.
-
BT Contact Sharing Disabled — blocks sharing contacts over Bluetooth (for example with a car kit).
-
Mobile Networks Config Disabled — the user cannot change mobile network settings.
-
VPN Config Disabled — the user cannot configure VPNs.
-
Data Roaming Disabled — mobile data cannot be used while roaming.
-
Outgoing Beam Disabled — blocks sending data from apps over NFC.
-
Cell Broadcasts Config Disabled — the user cannot change cell broadcast (emergency alert) settings.
Location
Location Mode
- LocationEnforced (default) — location services are forced on.
-
LocationUserChoice — location is not restricted; the user decides.
-
LocationDisabled — location services are forced off.
Note: on work profiles on company-owned devices running Android 11 or later, the device cannot switch location on or off by itself — the device is reported as non-compliant until the user changes the location setting themselves.
When Yes, location sharing is blocked.
Communication
-
Outgoing Calls Disabled — the device cannot make outgoing calls.
-
SMS Disabled — the device cannot send or receive SMS messages.
Device Security
Credentials Config Disabled
When Yes, the user cannot manage user credentials (such as installed certificates).
USB File Transfer Disabled
When Yes, transferring files over USB is blocked. Works on company-owned devices. For finer USB control, see USB Data Access in the Network and Connectivity policy.
Microphone Access
Controls the microphone on fully managed devices (no effect on other devices):
-
MicrophoneAccessUserChoice (default) — the microphone is available; on Android 12 and later the user can use the microphone access toggle.
-
MicrophoneAccessDisabled — the microphone is disabled device-wide.
-
MicrophoneAccessEnforced — the microphone is available and, on Android 12 and later, the user cannot turn it off with the microphone access toggle.
Network Reset Disabled
When Yes, the user cannot use the "reset network settings" function. Fully managed devices only.
System & User interface
Create Windows Disabled
When Yes, apps cannot create windows on top of other apps (overlays). This prevents pop-up style windows from covering the screen.
Printing Policy
-
PrintingAllowed (default) — the user may print.
-
PrintingDisallowed — printing is blocked. Android 9 or later.
Lock Screen Info
A text shown on the device's lock screen — for example the company name and a phone number for returning a lost device.
-
Select + Add Lock Screen Info.
-
Enter the text in Default Text.
Select Delete to remove the message again.
Viewing and Editing a Policy
-
In the policy list, select the eye button on the row you want to open.
-
If the policy is in use, Assigned to: at the top lists the device groups; each name is a link to that group.
-
Select Edit.
-
Change the settings. Select Save to keep the changes or Cancel to discard them.
Devices receive the updated settings through the device groups the policy is assigned to.

Copying a Policy
-
Select the copy button — either on the row in the list or at the bottom of an open policy.
-
In Enter display name for new copy, type a name of at least 3 characters.
-
Select Copy.
The copy contains every setting of the original, including the lock screen message. When you copy from an open policy, the copy is opened for you.
Templates
Administrators can save a policy as a global template with your organisation's preferred settings, and anyone can start a new policy from one with Create → Create from template +. See the Policy Templates manual.
Deleting a Policy
-
In the policy list, select the trash button on the row.
-
Confirm with Delete in the Confirm deletion dialog.
A policy that is still assigned to a device group cannot be deleted. Remove it from the group first.
Assigning the Policy to a Device Group
-
Open Device Groups and create a group or open an existing one.
-
In Device Functions, select the policy.
-
Save the group.
A device group can have one Device Function policy; a policy can be used by any number of groups. The Device Function column in the device group list shows which policy each group uses.
Minimum Android Version
Each policy shows a Min Android value in the list — the oldest Android version a device needs in order to apply everything in the policy:
-
Nothing beyond the defaults — Android 6
-
Printing Policy = PrintingDisallowed — Android 9
Individual options may additionally behave differently on older devices, as noted in the settings reference above.
Application Setting Policy
While an Application policy configures one specific app, an Application Setting policy sets the app-related rules that apply to the device as a whole:
-
whether the user may install and uninstall apps at all
-
how the managed Google Play store behaves — only approved apps, or everything except blocked apps
-
when apps are updated automatically
-
the default answer to app permission requests
-
an always-on VPN requirement
-
which keyboards and accessibility services are allowed
-
which client certificate an app receives when it asks for one (private key rules)
You create the policy once and assign it to one or more device groups. Every device in those groups receives the same settings.
Before You Start
-
You need the Admin, Editor, Enterprise Admin or Enterprise Editor role to create, edit, copy or delete policies. Viewers can only open and read them. See User Roles in the manual index.
-
Several settings here work together with other policies: per-app rules live in the Application policy, and blocking VPN changes lives in the Device Function policy. The settings reference below points these out.
Where to Find It
Open Policies in the left-hand menu and select Application Setting.
The list shows every policy in the enterprise with its Display name, the Assigned Device Groups and the Min Android version it requires. Use the Name filter and Search to narrow the list, and the page controls above and below the table to move between pages. Each row has view, copy and delete buttons.
How to Create a Policy
-
Open Policies → Application Setting.
-
Select Create, then Create new + (or Create from template + to start from a template — see the Policy Templates manual).
-
Enter a Description Name. This is required and must be unique within the enterprise.
-
Fill in the General section — see Settings Reference below. Switches start as No and dropdowns as Unspecified, which means "do not manage this setting". Only change what you actually want to enforce.
-
Optionally add Private Key Rules — see below.
-
Select Save.
If something is wrong, an error message appears at the top of the page and the policy is not saved.
What Happens Next?
The new policy appears in the list. It does nothing until you assign it to a device group — see Assigning the Policy to a Device Group further down.
Settings Reference
The option names below are exactly what the dropdowns show.
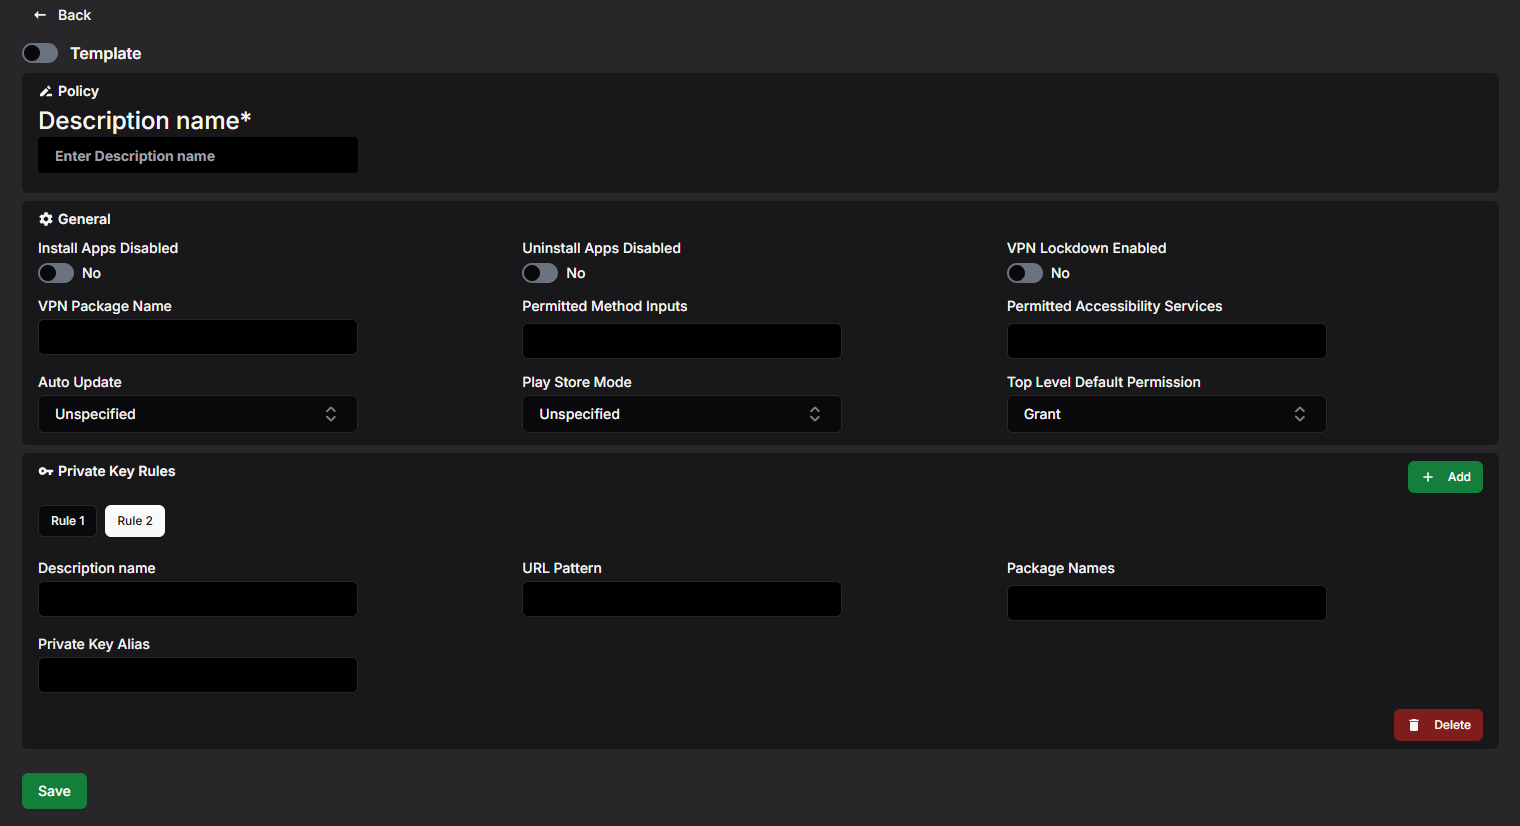
General
Install Apps Disabled
When Yes, the user cannot install apps themselves. Apps are then only delivered through Application policies.
Uninstall Apps Disabled
When Yes, the user cannot uninstall any app.
VPN Lockdown Enabled and VPN Package Name
Together these enforce an always-on VPN. Enter the package name of the VPN app in VPN Package Name (for example com.example.vpn); the device keeps that VPN connected at all times. When VPN Lockdown Enabled is Yes, the device gets no network access while the VPN is not connected.
To stop users from changing the VPN themselves, also set VPN Config Disabled in the Device Function policy. If a specific app must work even when the VPN is down, give it the VpnLockdownExemption in its Application policy.
Permitted Method Inputs
Restricts which keyboards (input methods) may be used. Type the package name of a keyboard app and press Enter or , to add it; only keyboards from the listed packages — plus the system's own — are then permitted. Leave the list empty to allow any keyboard.
Permitted Accessibility Services
Restricts which accessibility services may be used, the same way: list the allowed package names, and only those plus the system's built-in services are permitted. Leave empty to allow any. On a device with a work profile this affects both the work and the personal profile.
Auto Update
When apps on the device are updated automatically:
-
ChoiceToTheUser (default) — the user controls auto-updates.
-
Never — apps are never auto-updated.
-
WiFiOnly — apps are auto-updated over Wi-Fi only.
-
Always — apps are auto-updated at any time; mobile data charges may apply.
An app whose Application policy sets its own Auto Update Mode to postponed or high priority follows that instead of this setting.
Play Store Mode
-
Whitelist (default when Unspecified) — only apps that have an Application policy are available on the device, and any other app is uninstalled automatically.
-
Blacklist — all Play Store apps are available, and apps you want to keep out must be explicitly blocked with the Blocked install type in an Application policy.
Top Level Default Permission
The default answer when any app asks for a permission: Grant automatically, Prompt the user, or Deny automatically. An app's own Application policy (its Default Permission Policy and per-permission overrides) takes precedence over this device-wide default.
Private Key Rules
Private key rules decide which client certificate an app receives when it requests one — for example so a browser or an email app can authenticate against your services without asking the user to pick a certificate.
-
Select Add in the Private Key Rules section. A new tab (Rule 1, Rule 2, …) appears; the tab takes the rule's Description name once you enter one.
-
Fill in the fields below.
-
To remove the rule shown, select Delete at the bottom right of the section.
Description name
A name for the rule.
URL Pattern
The URLs the rule applies to, written as a regular expression. Leave empty to match all URLs.
Package Names
The apps the rule applies to. Type a package name and press Enter or , to add it. Leave the list empty to apply the rule to every app that requests a certificate. When several rules match a request, the last matching rule decides.
Private Key Alias
The alias of the private key (certificate) to hand out. The key must already be installed on the device under this alias.
Viewing and Editing a Policy
-
In the policy list, select the eye button on the row you want to open.
-
If the policy is in use, Assigned to: at the top lists the device groups; each name is a link to that group.
-
Select Edit.
-
Change the settings — private key rules can be added, changed and deleted here too. Select Save to keep the changes or Cancel to discard them.
Devices receive the updated settings through the device groups the policy is assigned to.
Copying a Policy
-
Select the copy button — either on the row in the list or at the bottom of an open policy.
-
In Enter display name for new copy, type a name of at least 3 characters.
-
Select Copy.
The copy contains every setting and private key rule of the original. When you copy from an open policy, the copy is opened for you.
Templates
Administrators can save a policy as a global template with your organisation's preferred settings, and anyone can start a new policy from one with Create → Create from template +. See the Policy Templates manual.
Deleting a Policy
-
In the policy list, select the trash button on the row.
-
Confirm with Delete in the Confirm deletion dialog.
A policy that is still assigned to a device group cannot be deleted. Remove it from the group first.
Assigning the Policy to a Device Group
-
Open Device Groups and create a group or open an existing one.
-
In Application Settings, select the policy.
-
Save the group.
A device group can have one Application Setting policy; a policy can be used by any number of groups.
Administrative Policy
An Administrative policy sets device administration rules for the devices in a device group:
-
whether the volume may be adjusted or external storage used
-
the oldest Android system version the devices are allowed to run
-
the default answer to app permission requests
-
for domain-managed enterprises, whether the device must be set up with a Google account from your domain
-
enforcement rules: what happens to a device that stays non-compliant with a part of its policy — first blocked, then wiped
You create the policy once and assign it to one or more device groups. Every device in those groups receives the same settings.
Before You Start
-
You need the Admin, Editor, Enterprise Admin or Enterprise Editor role to create, edit, copy or delete policies. Viewers can only open and read them. See User Roles in the manual index.
-
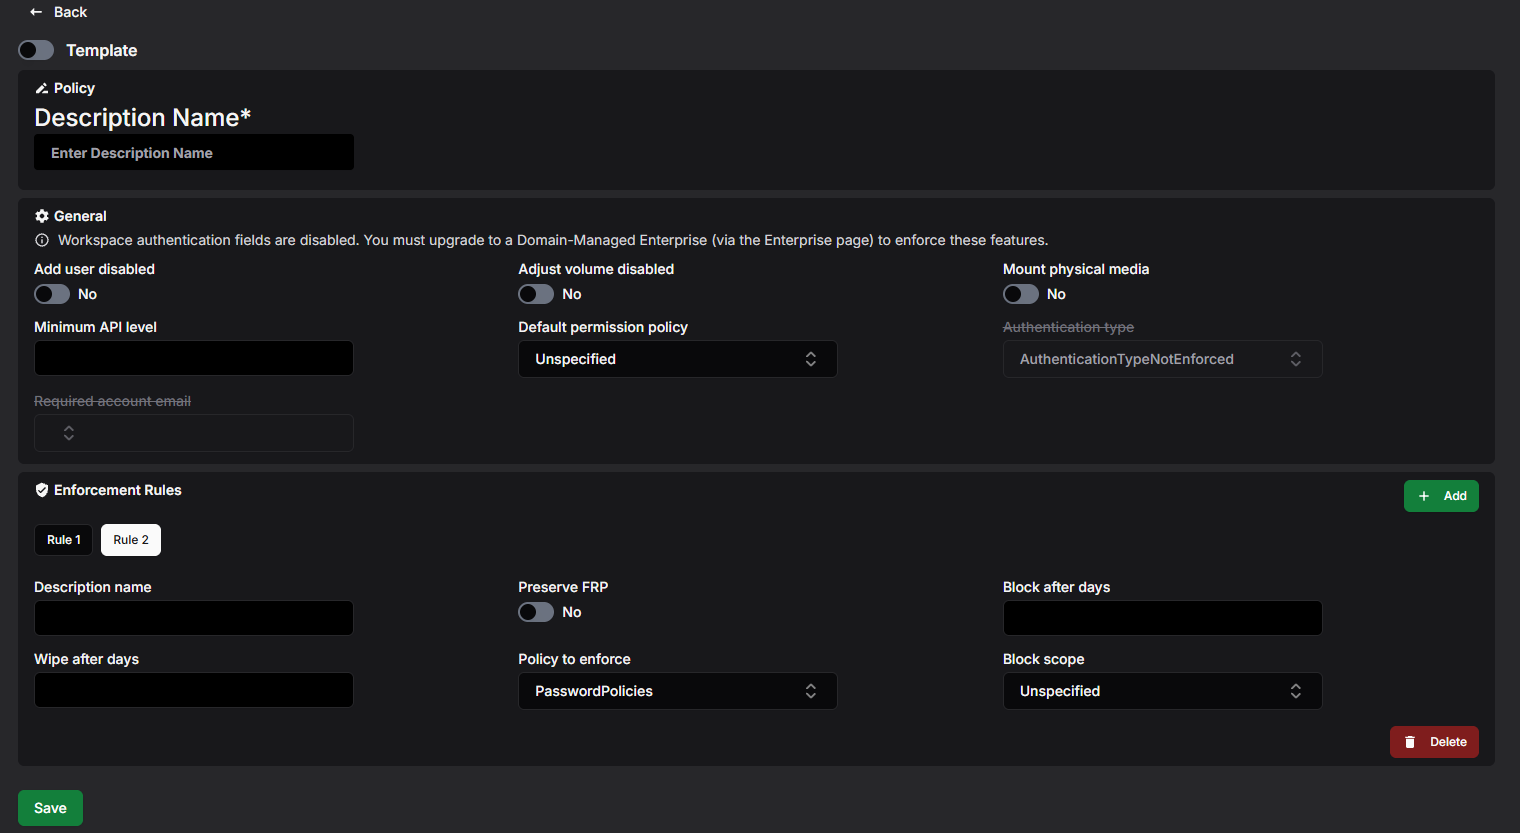
The Authentication type and Required account email fields only work for a Domain-Managed Enterprise. In other enterprises they are shown crossed out, with a note: Workspace authentication fields are disabled. You must upgrade to a Domain-Managed Enterprise (via the Enterprise page) to enforce these features.
-
Enforcement rules can end in a device wipe. Read the Enforcement Rules section carefully before setting one.
Where to Find It
Open Policies in the left-hand menu and select Administrative.
The list shows every policy in the enterprise with its Display name, the Assigned Device Groups and the Min Android version it requires. Use the Description name filter and Search to narrow the list. Each row has view, copy and delete buttons.
How to Create a Policy
-
Open Policies → Administrative.
-
Select Create, then Create new + (or Create from template + to start from a template — see the Policy Templates manual).
-
Enter a Description Name. This is required and must be unique within the enterprise.
-
Fill in the General section — see Settings Reference below.
-
Optionally add Enforcement Rules — see below.
-
Select Save.
If something is wrong, an error message appears at the top of the page and the policy is not saved. See Troubleshooting at the end for the most common messages.
What Happens Next?
The new policy appears in the list. It does nothing until you assign it to a device group — see Assigning the Policy to a Device Group further down.
Settings Reference
The option names below are exactly what the dropdowns show.
General
Add user disabled
When Yes, adding new users and profiles on the device is blocked. On fully managed devices users can never be added, regardless of this setting.
Adjust volume disabled
When Yes, the user cannot adjust the device's master volume, and the device is muted. Fully managed devices only.
Mount physical media
When Yes, using external storage (for example USB drives and memory cards) on the device is blocked.
Minimum API level
The minimum allowed Android system version, given as an API level (for example 30 for Android 11). A device running an older version is reported as non-compliant. Leave empty for no minimum.
Default permission policy
The default answer when an app asks for a permission:
-
Unspecified / Prompt — the user is asked.
-
Grant — permissions are granted automatically.
-
Deny — permissions are denied automatically.
An app's own Application policy can override this per app and per permission.
Authentication type and Required account email
A Google-mandated feature for Domain-Managed Enterprises: Google requires that a domain-managed device can be made to authenticate with a managed Google account, which is why these fields exist.
-
AuthenticationTypeNotEnforced (default) — no Google account requirement.
-
GoogleAuthenticated — the device must be set up with a Google account from the domain the enterprise is bound to. Required account email then lets you pin the exact account the device must use.
The available emails come from the Google domain the enterprise is bound to — only accounts on that same domain can be selected. This means the feature is unavailable unless the enterprise is bound under your own domain: without that binding the fields stay disabled and no accounts are offered.
Enforcement Rules
An enforcement rule decides what happens when a device does not comply with a particular part of its policy — for example when the user refuses to set a required password. The device is first blocked (apps and data are locked, and the user is shown what to fix) and, if the situation persists, wiped (a fully managed device is factory reset; a work profile is deleted).
-
Select Add in the Enforcement Rules section. A new tab (Rule 1, Rule 2, …) appears; the tab takes the rule's Description name once you enter one.
-
Fill in the fields below.
-
To remove the rule shown, select Delete at the bottom right of the section.
Description name
A name for the rule.
Policy to enforce
Which part of the policy the rule watches: PasswordPolicies (the password requirements from the Security policy) or Applications (the app requirements from the Application policies). Each option can be used by only one rule in the policy.
Block after days
How many days the device may stay non-compliant before it is blocked. 0 blocks it immediately. Must be smaller than Wipe after days.
Block scope
What the block covers on a company-owned device: WorkProfile (default when Unspecified) blocks only the work profile apps, Device blocks the whole device including personal apps.
Wipe after days
How many days the device may stay non-compliant before it is wiped. Must be larger than Block after days — there must be at least one day between the block and the wipe.
Preserve FRP
When Yes, factory-reset protection data survives the wipe, so the device still requires an authorised account after the reset. Applies to fully managed devices and work profiles on company-owned devices.
Viewing and Editing a Policy
-
In the policy list, select the eye button on the row you want to open.
-
If the policy is in use, Assigned to: at the top lists the device groups; each name is a link to that group.
-
Select Edit.
-
Change the settings — enforcement rules can be added, changed and deleted here too. Select Save to keep the changes or Cancel to discard them.
Devices receive the updated settings through the device groups the policy is assigned to.
Copying a Policy
-
Select the copy button — either on the row in the list or at the bottom of an open policy.
-
In Enter display name for new copy, type a name of at least 3 characters.
-
Select Copy.
The copy contains every setting and enforcement rule of the original. When you copy from an open policy, the copy is opened for you.
Templates
Administrators can save a policy as a global template with your organisation's preferred settings, and anyone can start a new policy from one with Create → Create from template +. See the Policy Templates manual.
Deleting a Policy
-
In the policy list, select the trash button on the row.
-
Confirm with Delete in the Confirm deletion dialog.
A policy that is still assigned to a device group cannot be deleted. Remove it from the group first.
Assigning the Policy to a Device Group
-
Open Device Groups and create a group or open an existing one.
-
In Administrative Policy, select the policy.
-
Save the group.
A device group can have one Administrative policy; a policy can be used by any number of groups. The Administrative column in the device group list shows which policy each group uses.
Interaction policy
An Interaction policy controls how users interact with the devices in a device group:
-
kiosk behaviour — locking the device down and deciding what the user can still reach (power menu, navigation buttons, status bar, settings)
-
display behaviour — wallpaper, screen brightness and screen timeout
-
support messages shown to the user where the administrator has disabled something
-
a setup action: an app that is launched while the device is being set up
You create the policy once and assign it to one or more device groups. Every device in those groups receives the same settings.
Before You Start
-
You need the Admin, Editor, Enterprise Admin or Enterprise Editor role to create, edit, copy or delete policies. Viewers can only open and read them. See User Roles in the manual index.
-
The Kiosk settings are all-or-nothing: as the form itself notes, if one Kiosk setting is configured to a value other than 'Unspecified', all Kiosk settings must also be configured.
-
Enforcing screen brightness or screen timeout needs Android 9 or later — the policy list shows the computed Min Android value for each policy.
Where to Find It
Open Policies in the left-hand menu and select Interaction.
The list shows every policy in the enterprise with its Display name, the Assigned Device Groups and the Min Android version it requires. Use the Name filter and Search to narrow the list. Each row has view, copy and delete buttons.
How to Create a Policy
-
Open Policies → Interaction.
-
Select Create, then Create new + (or Create from template + to start from a template — see the Policy Templates manual).
-
Enter a Description Name. This is required and must be unique within the enterprise.
-
Fill in the General, Kiosk and Display sections — see Settings Reference below. Switches start as No and dropdowns as Unspecified, which means "do not manage this setting".
-
Optionally add Support Messages and a Setup Action — see below.
-
Select Save Policy.
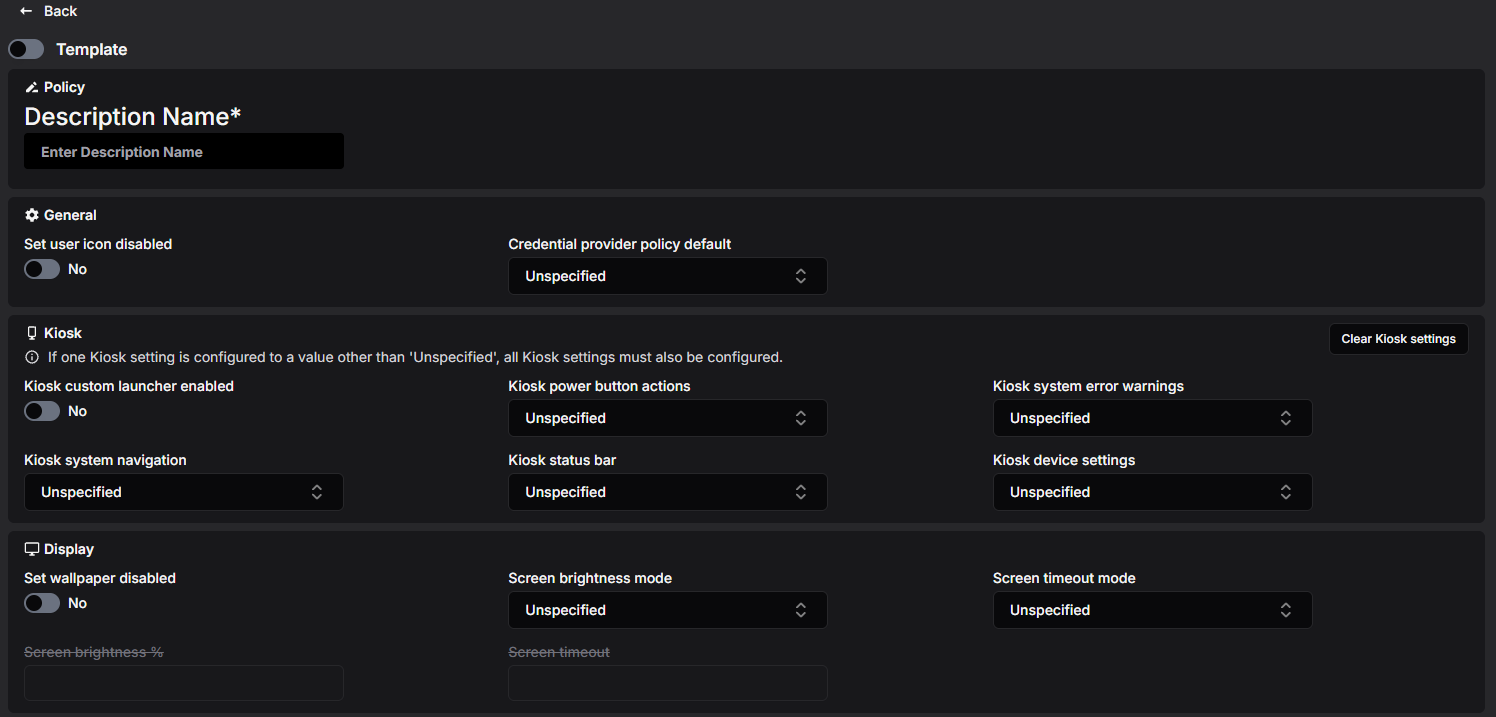
If something is wrong, an error message appears at the top of the page and the policy is not saved. See Troubleshooting at the end for the most common messages.
What Happens Next?
The new policy appears in the list. It does nothing until you assign it to a device group — see Assigning the Policy to a Device Group further down.
Settings Reference
The option names below are exactly what the dropdowns show.
General
Set user icon disabled
When Yes, the user cannot change the user icon. Android 7 or later.
Credential provider policy default
Whether apps may act as credential (password/passkey) providers on Android 14 and later, when the app's own Application policy does not say otherwise:
-
CredentialProviderDefaultDisallowed (default when Unspecified) — such apps may not act as credential providers.
-
CredentialProviderDefaultDisallowedExceptSystem — such apps may not act as credential providers, except the device maker's default ones.
-
CredentialProviderDefaultAllowed — such apps may act as credential providers.
Kiosk
These settings control a device running in kiosk mode. A device enters kiosk mode either through an app with the Kiosk role (see the Application Policy manual) or by turning on Kiosk custom launcher enabled here.
Remember: set either none or all of the Kiosk dropdowns. The Clear Kiosk settings button at the top right of the section resets them all back to Unspecified.
Kiosk custom launcher enabled
When Yes, the device's home screen is replaced with a launcher that locks the device down to the apps delivered through Application policies, shown on a single page in alphabetical order. Use this for a multi-app kiosk; for a single-app kiosk, give that app the Kiosk role instead.
Kiosk system error warnings
-
ErrorWarningsEnabled — system error dialogs (app crash, app not responding) are shown.
-
ErrorWarningsMuted (default) — error dialogs are hidden; a crashed or unresponsive app is force-stopped silently.
Kiosk status bar
-
NotificationsAndSystemInfoEnabled — the status bar shows system info and notifications. Requires Kiosk system navigation to be NavigationEnabled or HomeButtonOnly.
-
NotificationsAndSystemInfoDisabled (default) — the status bar is disabled.
-
SystemInfoOnly — only system info (clock, battery) is shown.
Kiosk device settings
-
SettingsAccessAllowed (default) — the Settings app can be opened in kiosk mode.
-
SettingsAccessBlocked — the Settings app is blocked.
Display
Set wallpaper disabled
When Yes, the user cannot change the wallpaper.
Screen brightness mode and Screen brightness %
-
BrightnessUserChoice (default) — the user controls the brightness; the brightness value must be left empty.
-
BrightnessAutomatic — brightness adjusts automatically and the user cannot change it; a Screen brightness % value (1–100) is taken into account in the automatic adjustment.
-
BrightnessFixed — brightness is fixed to Screen brightness % (1–100, required) and the user cannot change it.
Automatic and Fixed need Android 9 or later on fully managed devices (Android 15 or later on work profiles on company-owned devices).
Screen timeout mode and Screen timeout
-
ScreenTimeoutUserChoice (default) — the user controls the screen timeout; the timeout value must be left empty.
-
ScreenTimeoutEnforced — the screen turns off after Screen timeout seconds (required) and the user cannot change it. Same device and Android version support as the brightness enforcement above.
Support Messages
Messages shown to the device user in the settings screens. Select + Add Support Message to add them; this creates two messages, each with a Default Text and a Description Name:
-
the first is the short support message, shown wherever a feature has been disabled by the administrator (texts longer than 200 characters may be cut off)
-
the second is the long support message, shown in the device administrator's settings screen
Select the delete button to remove both messages again.

Setup Action
A setup action launches a chosen app while the device is being set up — for example an app that guides the user through enrolment. Only one setup action can be configured.
-
Select + Add Setup Action.
-
In Launch app, pick the app to launch. In the device group where this policy is used, that app must be delivered with install type RequiredForSetup.
-
Adjust the Setup Action Title and Setup Action Description texts shown to the user during setup (pre-filled with "App Launch" / "The app will launch automatically").
Select the delete button to remove the setup action.
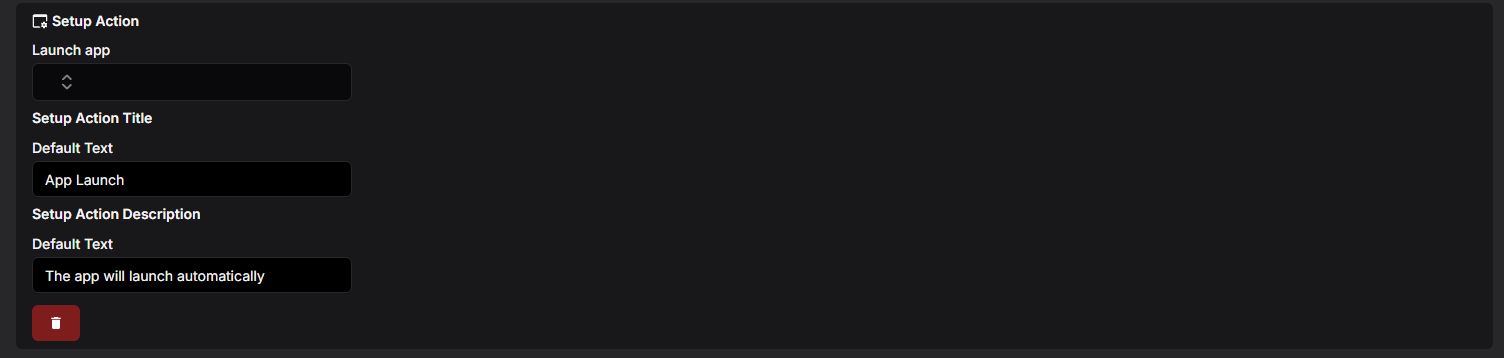
Note: if the device management client app is used in the device group, the setup action configured here is omitted entirely — the system replaces it with its own setup action that launches the client during setup.
Viewing and Editing a Policy
-
In the policy list, select the eye button on the row you want to open.
-
If the policy is in use, Assigned to: at the top lists the device groups; each name is a link to that group.
-
Select Edit.
-
Change the settings — support messages and the setup action can be added, changed and deleted here too. Select Save to keep the changes or Cancel to discard them.
Devices receive the updated settings through the device groups the policy is assigned to.

Copying a Policy
-
Select the copy button — either on the row in the list or at the bottom of an open policy.
-
In Enter display name for new copy, type a name of at least 3 characters.
-
Select Copy.
The copy contains every setting, the support messages and the setup action of the original. When you copy from an open policy, the copy is opened for you.
Templates
Administrators can save a policy as a global template with your organisation's preferred settings, and anyone can start a new policy from one with Create → Create from template +. See the Policy Templates manual.
Deleting a Policy
-
In the policy list, select the trash button on the row.
-
Confirm with Delete in the Confirm deletion dialog.
A policy that is still assigned to a device group cannot be deleted. Remove it from the group first.
Assigning the Policy to a Device Group
-
Open Device Groups and create a group or open an existing one.
-
In Interaction Policy, select the policy.
-
Save the group.
A device group can have one Interaction policy; a policy can be used by any number of groups. The Interaction column in the device group list shows which policy each group uses.
Minimum Android Version
Each policy shows a Min Android value in the list — the oldest Android version a device needs in order to apply everything in the policy:
-
Nothing beyond the defaults — Android 6
-
Screen brightness mode = BrightnessAutomatic or BrightnessFixed, or a Screen brightness % value — Android 9
-
Screen timeout mode = ScreenTimeoutEnforced, or a Screen timeout value — Android 9
Security Policy
A Security policy protects the devices in a device group:
-
the lock screen: whether there is one, how fast the device locks, and which lock screen features are available
-
device protection: encryption, camera, screenshots, factory reset, apps from unknown sources, Google Play Protect, and hardened security modes
-
access to developer settings, account changes and user removal
-
what device information the devices report back
-
password requirements, with separate rules possible for the device and the work profile
You create the policy once and assign it to one or more device groups. Every device in those groups receives the same settings.
Before You Start
-
You need the Admin, Editor, Enterprise Admin or Enterprise Editor role to create, edit, copy or delete policies. Viewers can only open and read them. See User Roles in the manual index.
-
A new policy starts with "Lockscreen disabled" set to Yes. If your devices should have a lock screen, switch it off before saving.
-
A password rule with Maximum failed for swipe set will wipe the device after that many wrong password attempts. Double-check the value.
-
Common criteria mode is a strict security model intended for national security systems and similar high-sensitivity environments — normal device use may be affected. Enable it only if you are required to.
Where to Find It
Open Policies in the left-hand menu and select Security.
The list shows every policy in the enterprise with its Display name, the Assigned Device Groups and the Min Android version it requires. Use the Name filter and Search to narrow the list. Each row has view, copy and delete buttons.
How to Create a Policy
-
Open Policies → Security.
-
Select Create, then Create new + (or Create from template + to start from a template — see the Policy Templates manual).
-
Enter a Description Name. This is required and must be unique within the enterprise.
-
Go through the sections described under Settings Reference below. Dropdowns set to Unspecified mean "do not manage this setting".
-
Optionally add password rules under Password Settings — see below.
-
Select Save.
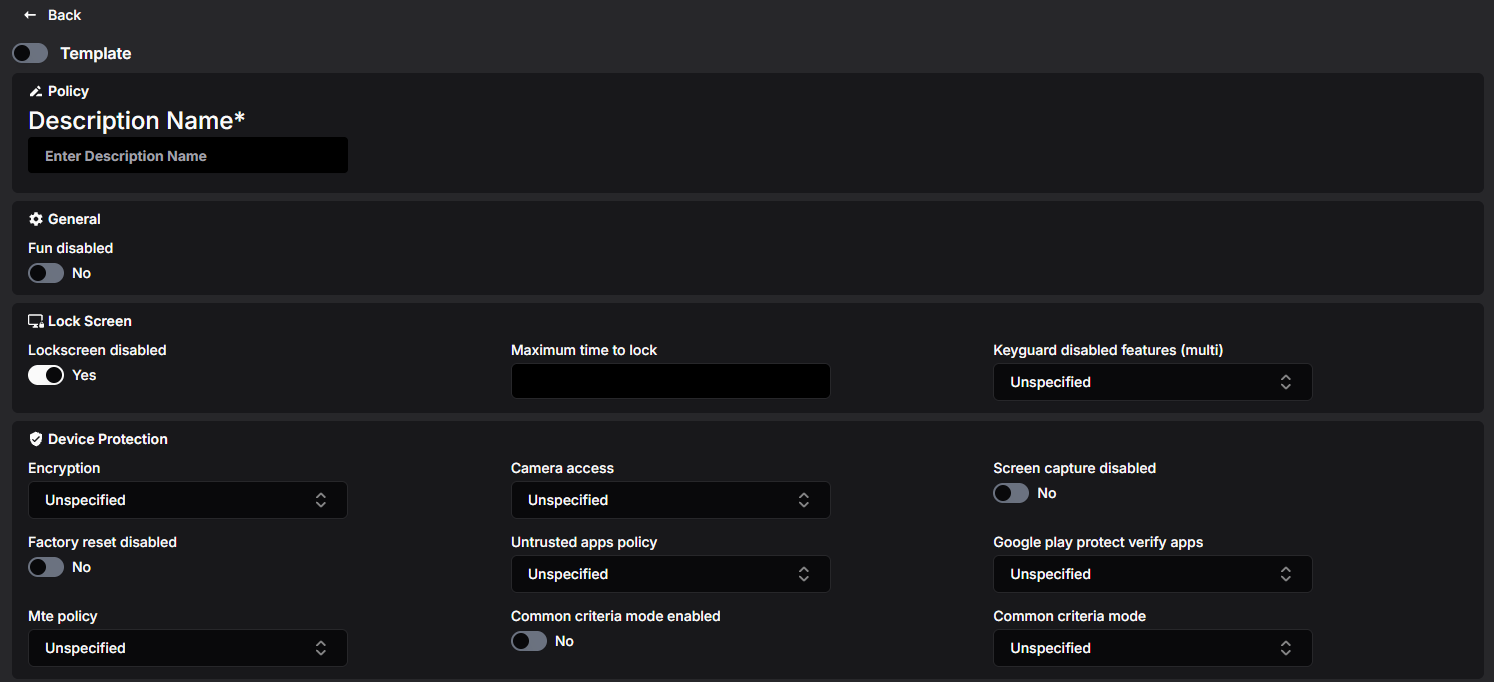
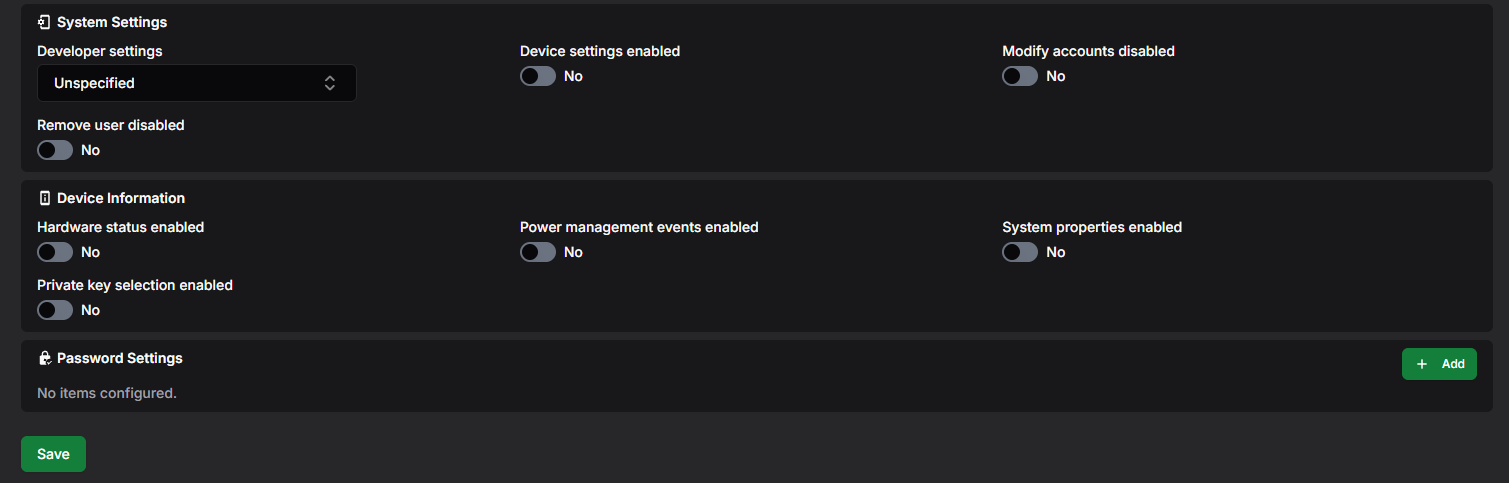
If something is wrong, an error message appears at the top of the page and the policy is not saved.
What Happens Next?
The new policy appears in the list. It does nothing until you assign it to a device group — see Assigning the Policy to a Device Group further down.
Settings Reference
The option names below are exactly what the dropdowns show.
General
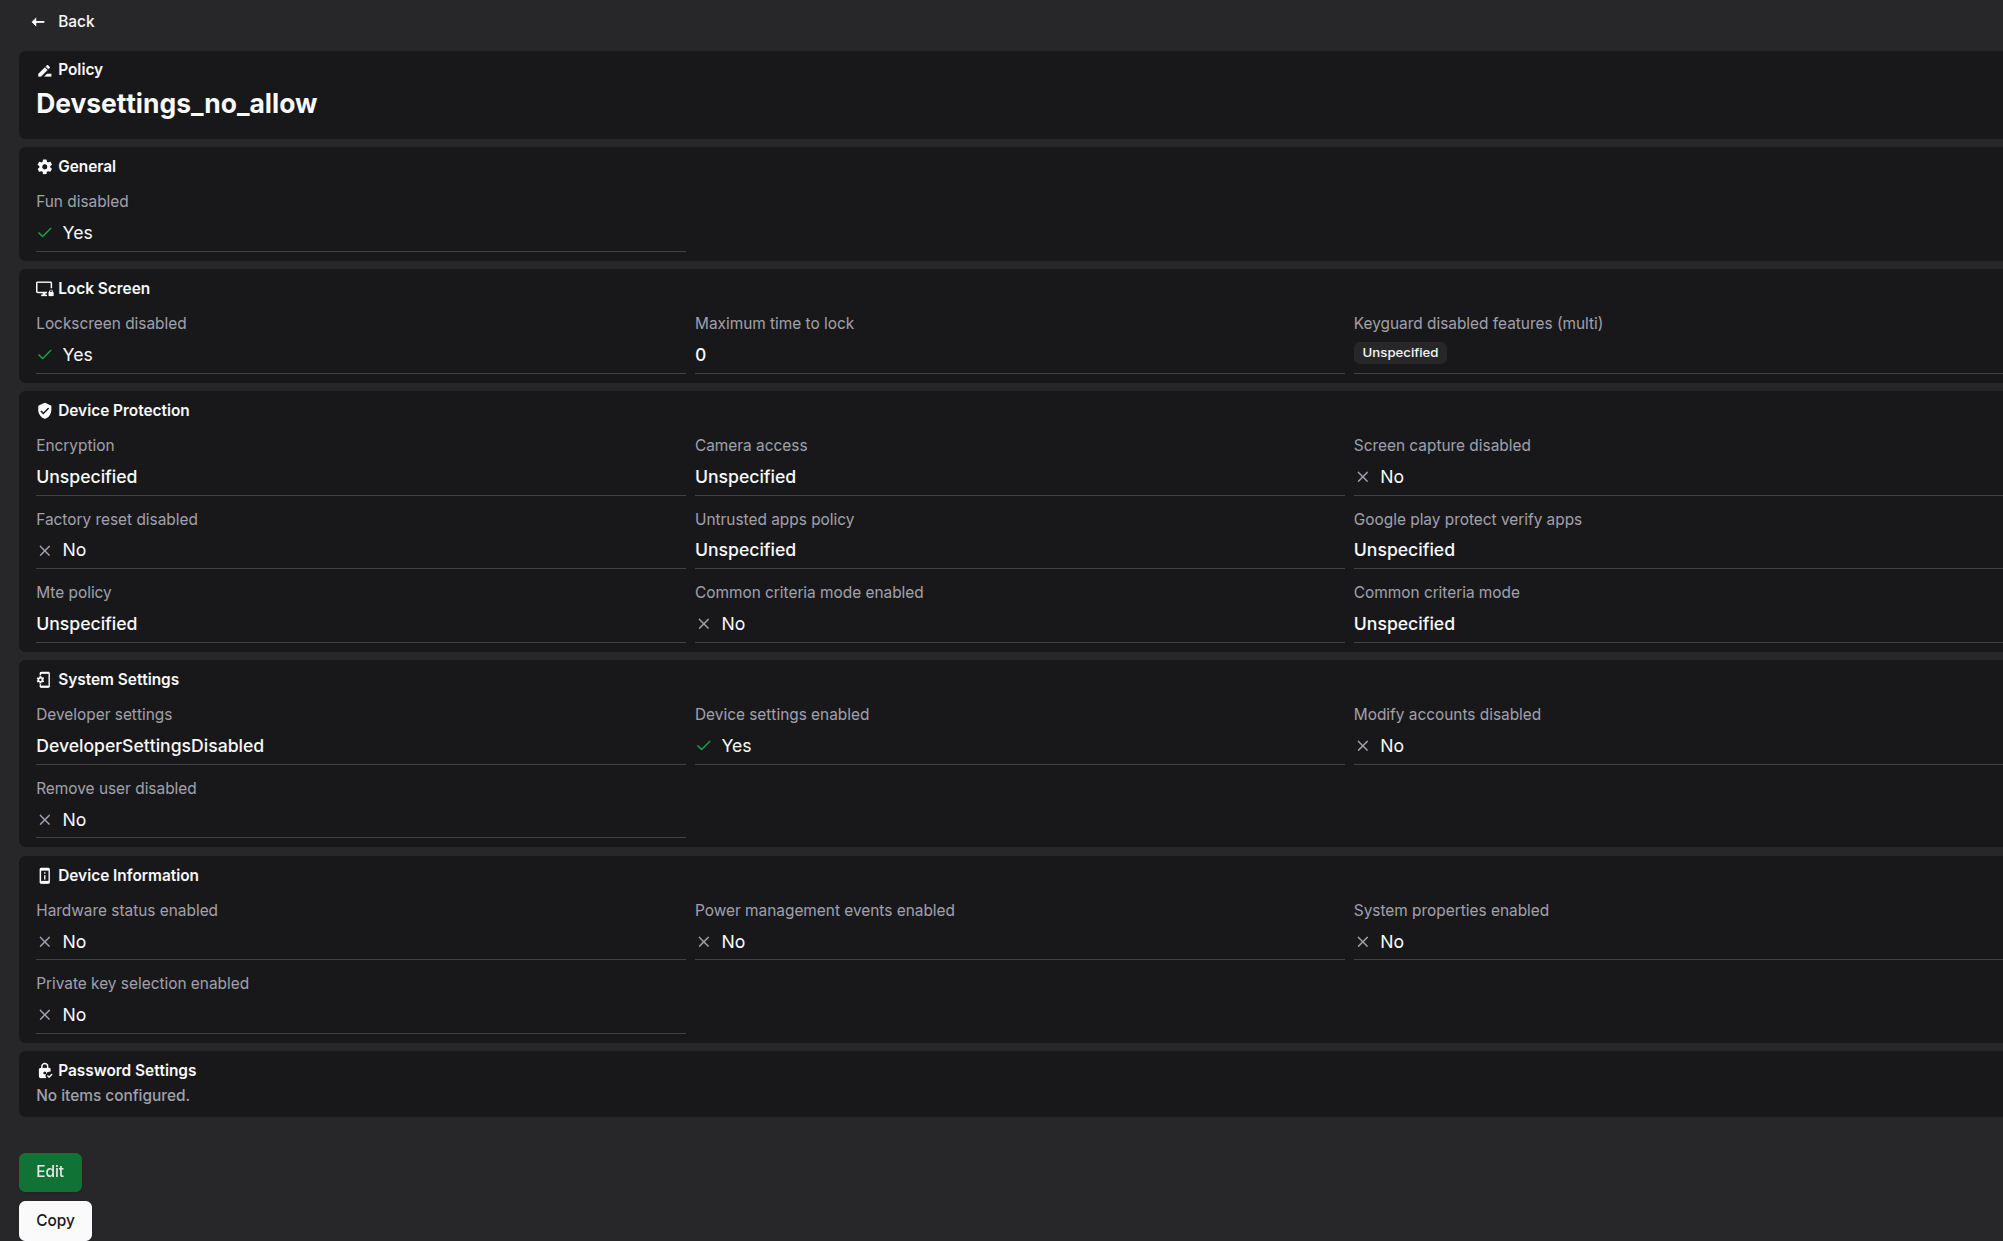
Fun disabled
Lock Screen
Lockscreen disabled
When Yes (the default for a new policy), the device has no lock screen at all. Intended for dedicated single-purpose devices. Set to No for devices that should lock.
Maximum time to lock
How long the device may stay unlocked without user activity, in milliseconds (for example 60000 = one minute). Empty or 0 means no restriction.
Keyguard disabled features (multi)
Features to remove from the lock screen. You can select several:
-
Camera — no camera on the lock screen.
-
Notifications — no notifications shown; UnredactedNotifications — hide notification content only.
-
TrustAgents — ignore trust agents (such as trusted-place unlocking).
-
DisableFingerprint, Face, Iris, Biometrics — disable the given unlock methods on the lock screen (Biometrics covers all of them).
-
Shortcuts — disable lock screen shortcuts (Android 14 or later).
-
AllFeatures — disable all current and future lock screen customisations.
Device Protection
Encryption
-
EnabledWithoutPassword — device encryption is required, without requiring a password to start the device.
-
EnabledWithPassword — encryption is required and a password is needed to start the device.
Camera access
-
CameraAccessUserChoice (default) — all cameras available; on Android 12 and later the user can use the camera access toggle.
-
CameraAccessDisabled — all cameras are disabled (device-wide on fully managed devices, work profile only on work-profile devices).
-
CameraAccessEnforced — cameras are available and, on fully managed devices running Android 12 or later, the user cannot turn them off with the camera access toggle.
Screen capture disabled
When Yes, taking screenshots is blocked.
Factory reset disabled
When Yes, the user cannot factory reset the device from settings.
Untrusted apps policy
Apps from unknown sources (outside Google Play):
-
DisallowInstall (default) — blocked on the entire device.
-
AllowInstallInPersonalProfileOnly — allowed only in the personal profile of a device with a work profile.
-
AllowInstallDeviceWide — allowed everywhere.
Google play protect verify apps
-
VerifyAppsEnforced (default) — Google's app verification is forced on.
-
VerifyAppsUserChoice — the user chooses whether to enable it.
Mte policy
Memory Tagging Extension, a hardware memory-safety feature on supporting devices:
-
MteUserChoice (default) — the user may enable or disable it.
-
MteEnforced — forced on (fully managed devices and work profiles on company-owned devices).
-
MteDisabled — forced off (fully managed devices only).
Enforcing or disabling needs Android 14 or later and a reboot to take effect.
Common criteria mode enabled and Common criteria mode
Common criteria mode set to CommonCriteriaModeEnabled puts the device into Common Criteria (CC) mode — hardened security standards including stronger Bluetooth key encryption and stricter certificate validation. Company-owned devices on Android 11 or later only. Turning it off again may lose the user-configured Wi-Fi networks on the device.
Common criteria mode enabled (the switch) makes the device report its Common Criteria status, including the policy integrity check; recommended when CC mode is in use.
System Settings
Developer settings
-
DeveloperSettingsDisabled (default) — developer options and safe boot are blocked.
-
DeveloperSettingsAllowed — the user may access developer settings.
Device settings enabled
When Yes, devices report their device settings information.
Modify accounts disabled
When Yes, the user cannot add or remove accounts.
Remove user disabled
When Yes, the user cannot remove other users from the device.
Device Information
These switches control what the devices report back for viewing in the console:
-
Hardware status enabled — hardware health (for example temperatures).
-
Power management events enabled — battery and power events.
-
System properties enabled — device system properties.
Hardware status and power management reports are not available for personally owned devices with a work profile.
Private key selection enabled
When Yes, the device may show the user a dialog to choose a certificate when an app requests one and no private key rule matches (see the Application Setting Policy manual for private key rules).
Password Settings
Password rules for the devices. Select Add to create a rule; each rule appears as a tab (Setting 1, Setting 2, …). Use the Scope field to give the device and the work profile different rules. Select Delete to remove the rule shown.
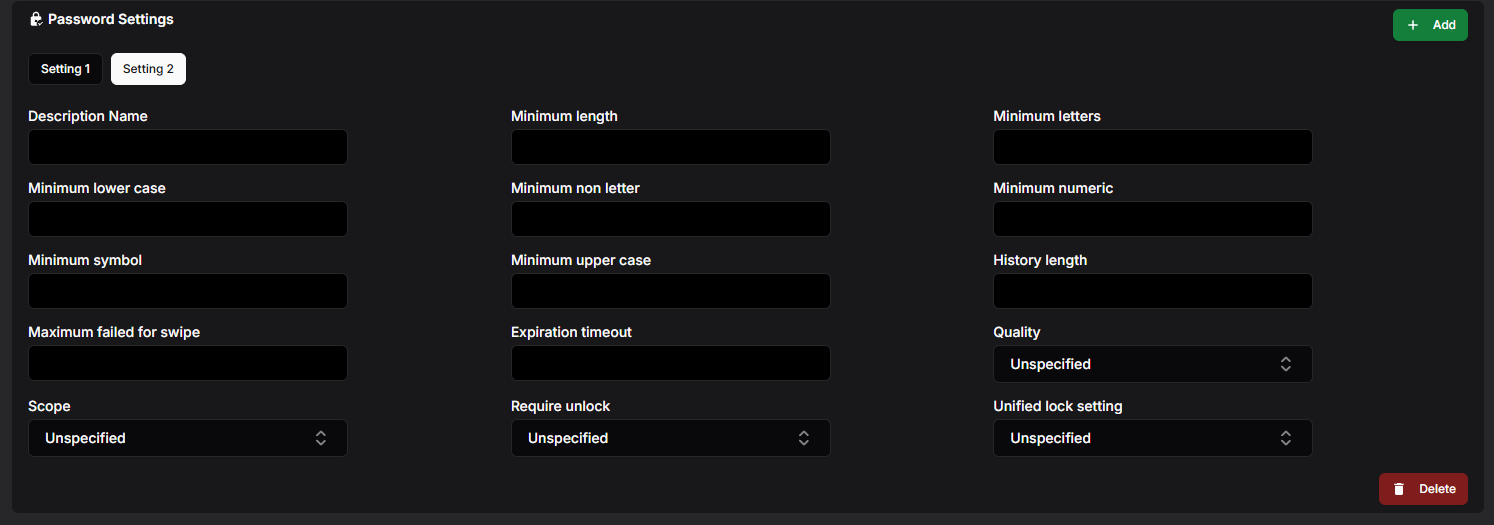
Description Name
A name for the rule.
Quality
The kind of lock required:
-
Something — any lock (no restrictions on content).
-
BiometricWeak — at least a low-security biometric method.
-
Numeric / NumericComplex — a PIN; the complex variant forbids repeating (4444) and ordered (1234) sequences.
-
Alphabetic / Alphanumeric — letters, or letters and numbers.
-
Complex — the password must meet the individual minimum fields below.
-
ComplexityLow / ComplexityMedium / ComplexityHigh — Android's complexity bands, from pattern/simple PIN up to at least an 8-digit PIN or 6-character password.
Minimum length
The shortest allowed password. Applies to the Numeric, NumericComplex, Alphabetic, Alphanumeric and Complex qualities.
Minimum letters, Minimum lower case, Minimum non letter, Minimum numeric, Minimum symbol, Minimum upper case
How many characters of each kind the password must contain. These apply only when Quality is Complex.
History length
How many previous passwords are remembered; the user cannot reuse any password in the history. 0 means no restriction.
Maximum failed for swipe
How many wrong unlock attempts are allowed before the device is wiped. 0 means no restriction.
Expiration timeout
How long a password stays valid before it must be changed, in seconds. 0 means it never expires.
Scope
-
ScopeDevice (default) — the rule applies to the whole device.
-
ScopeProfile — the rule applies to the work profile.
Require unlock
How long after unlocking with the password/PIN/pattern the device may be unlocked with other methods (such as fingerprint):
-
UseDefaultDeviceTimeout (default) — the device's own timeout.
-
RequireEveryDay — the strong method is required at least every 24 hours.
Unified lock setting
For devices with a work profile on Android 9 or later:
-
AllowUnifiedWorkAndPersonalLock (default) — one lock may cover both the device and the work profile.
-
RequireSeparateWorkLock — the work profile must have its own lock.
Viewing and Editing a Policy
-
In the policy list, select the eye button on the row you want to open.
-
If the policy is in use, Assigned to: at the top lists the device groups; each name is a link to that group.
-
Select Edit.
-
Change the settings — password rules can be added, changed and deleted here too. Select Save to keep the changes or Cancel to discard them.
Devices receive the updated settings through the device groups the policy is assigned to.
Copying a Policy
-
Select the copy button — either on the row in the list or at the bottom of an open policy.
-
In Enter display name for new copy, type a name of at least 3 characters.
-
Select Copy.
The copy contains every setting and password rule of the original. When you copy from an open policy, the copy is opened for you.
Templates
Administrators can save a policy as a global template with your organisation's preferred settings, and anyone can start a new policy from one with Create → Create from template +. See the Policy Templates manual.
Deleting a Policy
-
In the policy list, select the trash button on the row.
-
Confirm with Delete in the Confirm deletion dialog.
A policy that is still assigned to a device group cannot be deleted. Remove it from the group first.
Assigning the Policy to a Device Group
-
Open Device Groups and create a group or open an existing one.
-
In Security Policy, select the policy.
-
Save the group.
A device group can have one Security policy; a policy can be used by any number of groups.
Tip: if a device staying non-compliant with the password rules should be blocked or wiped automatically, add an enforcement rule for PasswordPolicies in the Administrative policy — see the Administrative Policy manual.
Minimum Android Version
Each policy shows a Min Android value in the list — the oldest Android version a device needs in order to apply everything in the policy:
-
Nothing beyond the defaults — Android 6
-
Mte policy = MteEnforced or MteDisabled — Android 14
Individual options may additionally behave differently on older devices, as noted in the settings reference above.
System Update Policy
A System Update policy controls how the devices in a device group install Android system updates:
-
install updates automatically, only within a daily maintenance window, or postpone them
-
freeze periods — parts of the year during which no system updates are installed at all, for example during a busy season
You create the policy once and assign it to one or more device groups. Every device in those groups receives the same settings.
Before You Start
-
You need the Admin, Editor, Enterprise Admin or Enterprise Editor role to create, edit, copy or delete policies. Viewers can only open and read them. See User Roles in the manual index.
-
Freeze periods only take effect when Update Type is set — with Unspecified they do nothing.
-
A freeze period also blocks security patches. Keep freeze periods as short as the situation allows.
Where to Find It
Open Policies in the left-hand menu and select System Update.
The list shows every policy in the enterprise with its Display name, the Assigned Device Groups and the Min Android version it requires. Filter by Name or Update Type and select Search. Each row has view, copy and delete buttons.
How to Create a Policy
-
Open Policies → System Update.
-
Select Create, then Create new + (or Create from template + to start from a template — see the Policy Templates manual).
-
Enter a Description Name. This is required and must be unique within the enterprise.
-
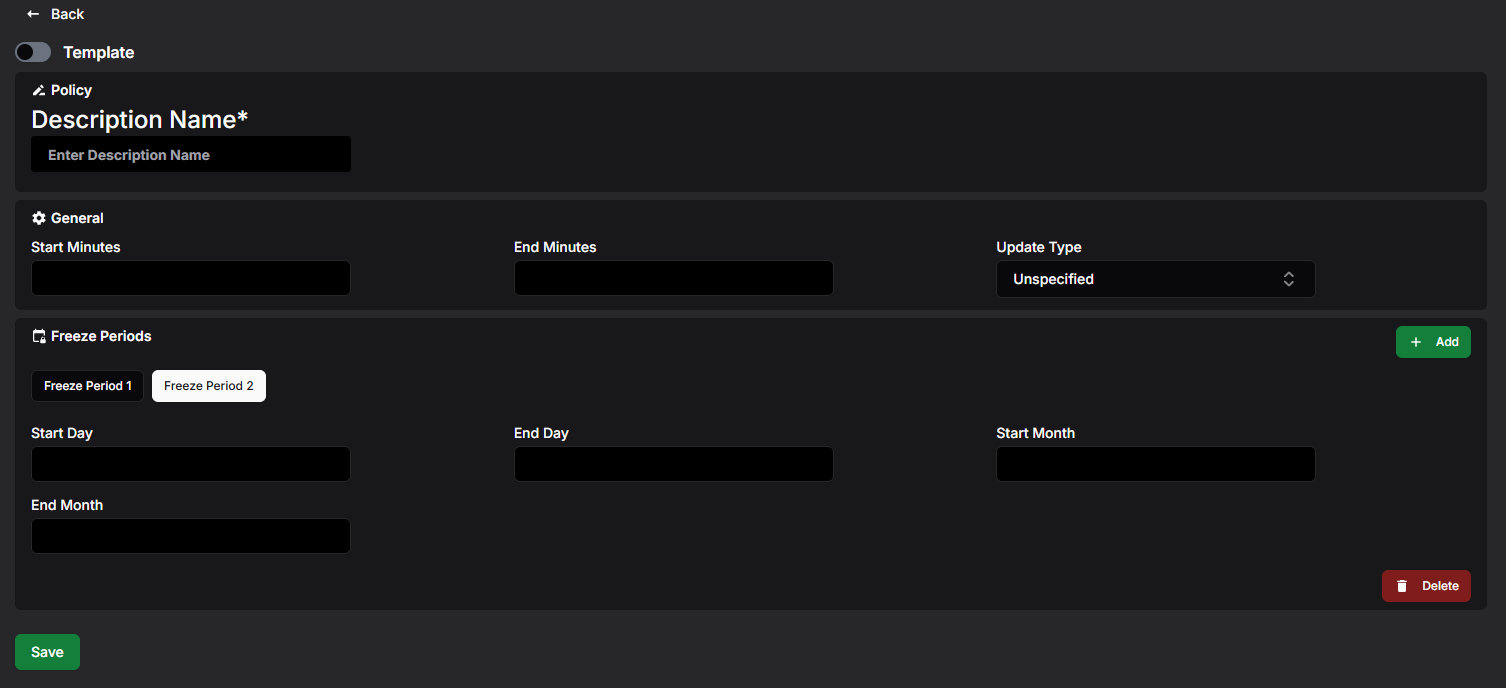
Choose the Update Type, and for a windowed update the Start Minutes and End Minutes — see Settings Reference below.
-
Optionally add Freeze Periods — see below.
-
Select Save.
If something is wrong, an error message appears at the top of the page and the policy is not saved. See Troubleshooting at the end for the most common messages.
What Happens Next?
The new policy appears in the list. It does nothing until you assign it to a device group — see Assigning the Policy to a Device Group further down.
Settings Reference
General
Update Type
How system updates are installed:
-
Unspecified — the device's default behaviour, which typically asks the user to accept updates.
-
Automatic — updates install automatically as soon as they are available.
-
Windowed — updates install automatically, but only inside the daily maintenance window given by Start Minutes and End Minutes. App updates from Google Play also happen in this window. Strongly recommended for kiosk devices — it is the only way an app that is pinned to the foreground can be updated. An app whose Application policy sets AutoUpdateHighPriority ignores the window.
-
Postpone — automatic installation is postponed by up to 30 days. Security patches are not affected and still install.
Start Minutes and End Minutes
The daily maintenance window for the Windowed type, given as minutes after midnight in the device's local time (0–1439; for example 120 = 02:00 and 300 = 05:00). If the end is smaller than the start, the window runs over midnight. A window shorter than 30 minutes is extended to 30 minutes. Both fields are required for Windowed and must be left empty for every other type.
Freeze Periods
A freeze period is a yearly repeating date range during which the device installs no system updates at all — including security patches. Outside the freeze periods the chosen update type applies as normal.
-
Select Add in the Freeze Periods section. A new tab (Freeze Period 1, Freeze Period 2, …) appears.
-
Enter the start and end dates as numbers: Start Day (1–31), Start Month (1–12), End Day, End Month. The dates repeat every year — for example start 1.12. and end 15.1. freezes updates from December 1st to January 15th, over the year end.
-
To remove the period shown, select Delete at the bottom right of the section.
Rules for freeze periods:
-
a period may be at most 90 days long
-
periods must not overlap, and there must be at least 60 days between them, so a device is never frozen indefinitely
-
February 29th is ignored in the calculations; a period starting or ending on it behaves as February 28th
Viewing and Editing a Policy
-
In the policy list, select the eye button on the row you want to open.
-
If the policy is in use, Assigned to: at the top lists the device groups; each name is a link to that group.
-
Select Edit.
-
Change the settings — freeze periods can be added, changed and deleted here too. Select Save to keep the changes or Cancel to discard them.
Devices receive the updated settings through the device groups the policy is assigned to.
Copying a Policy
-
Select the copy button — either on the row in the list or at the bottom of an open policy.
-
In Enter display name for new copy, type a name of at least 3 characters.
-
Select Copy.
The copy contains the update type, window and freeze periods of the original. When you copy from an open policy, the copy is opened for you.
Templates
Administrators can save a policy as a global template with your organisation's preferred settings, and anyone can start a new policy from one with Create → Create from template +. See the Policy Templates manual.
Deleting a Policy
-
In the policy list, select the trash button on the row.
-
Confirm with Delete in the Confirm deletion dialog.
A policy that is still assigned to a device group cannot be deleted. Remove it from the group first.
Assigning the Policy to a Device Group
-
Open Device Groups and create a group or open an existing one.
-
In System Update Policy, select the policy.
-
Save the group.
A device group can have one System Update policy; a policy can be used by any number of groups. The System Update column in the device group list shows which policy each group uses.
Notifications
Notifications tell you what your devices are doing while you work in the console. A bell in the header shows how many unread notifications you have, and new ones arrive live without reloading the page. Each notification belongs to one enterprise and one user, and opening it takes you straight to the device it is about.
Before You Start
- Every role receives notifications, including Viewers; there is nothing to enable
- Notifications are delivered only to users who have the console open in that enterprise at the moment the event happens; if you are logged out or on another enterprise, you do not receive them later
- Notifications are separate from Alerts. Alerts are announcements written by administrators for everyone; notifications are automatic messages about individual devices
- Device status notifications depend on the KMM Client being installed on the device through its device group
Where to Find It
The bell icon sits in the header, to the left of the theme toggle, once an enterprise is selected. A red badge on the bell shows the number of unread notifications (99+ when there are more). Select the bell to open the Notifications list.
What Triggers a Notification
Client Status Changed
Sent when a device's KMM Client goes online or offline. The client sends a heartbeat to the server; when no heartbeat has arrived for about a minute the device is reported offline, and the next heartbeat reports it online again. Status is checked every 20 seconds, so a change shows up within roughly one to two minutes. A change between a good and a weak connection (round trip above 250 ms, or three missed heartbeat replies in a row) updates the dot live but does not create a notification.
Message: Client on device is now online. or …is now offline.
Task Completed
Message: Task " on device completed successfully.
Task Failed
Sent when such a task fails. The failure reason reported by the device is appended when one is available.
Message: Task '' on device failed: .
Screenshot Ready
Screenshot Failed
Reading a Notification
Each entry shows the title, the message and the time it was created in your local time. Unread entries have a light blue background; read entries are dimmed and carry a green check mark.
Select an entry to open the device it concerns. Opening an unread notification marks it as read at the same time.
Marking Notifications as Read
- Single notification: select it; it is marked read and the device page opens
- All notifications: select Mark all as read at the top of the list; the link appears only while unread notifications exist
Marking a notification as read removes it from the server. It stays visible with a check mark until you reload the page, after which the list shows only unread notifications.
How Delivery Works
- When you open the console or switch enterprise, the list loads your unread notifications for that enterprise
- New notifications are pushed to your browser over an open connection while the console is open; a notification is created for each user connected to the enterprise at that moment
- Unread notifications are kept until you mark them as read; there is no automatic expiry
- Switching enterprise switches the notification list, because notifications are scoped to the enterprise they were created in
- If the connection drops, the browser reconnects on its own; notifications created while disconnected are not delivered