Application Policy
An Application policy controls a single app on the devices in a device group:
-
how the app gets on the device — installed automatically, offered for installation, blocked, or delivered as your own uploaded APK
-
whether the user can remove or disable it, and whether its permissions are granted automatically
-
how the app updates, and constraints for the installation (network, charging, idle)
-
a managed configuration that pre-fills the app's own settings
-
special roles such as running the device as a kiosk
You create one Application policy per app, and attach the policies to device groups. Every device in those groups receives the same app setup.
Before You Start
-
You need the Admin, Editor, Enterprise Admin or Enterprise Editor role to create, edit, copy or delete policies. Viewers can only open and read them.
-
The app itself must already exist in the enterprise — approved from managed Google Play, or uploaded as a custom APK — so that it appears under Applications → Application List. Only apps from that list can be selected in a policy.
-
If you want to pre-fill the app's settings, create the managed configuration for the app first under Managed Configurations.
-
Some options need a minimum Android version — the policy list shows the computed Min Android value for each policy.
Where to Find It
Open Policies in the left-hand menu and select Application.
The list shows every application policy with its Display name, Package, Assigned Device Groups, Disabled state and Min Android version. Filter by Name or Package and select Search; Advanced search adds filters for Disabled and Install Type. Each row has view, copy and delete buttons.
How to Create a Policy
-
Open Policies → Application.
-
Select Create, then Create new + (or Create from template + to start from a template — see the Policy Templates manual).
-
Enter a Description Name. This is required and must be unique within the enterprise.
-
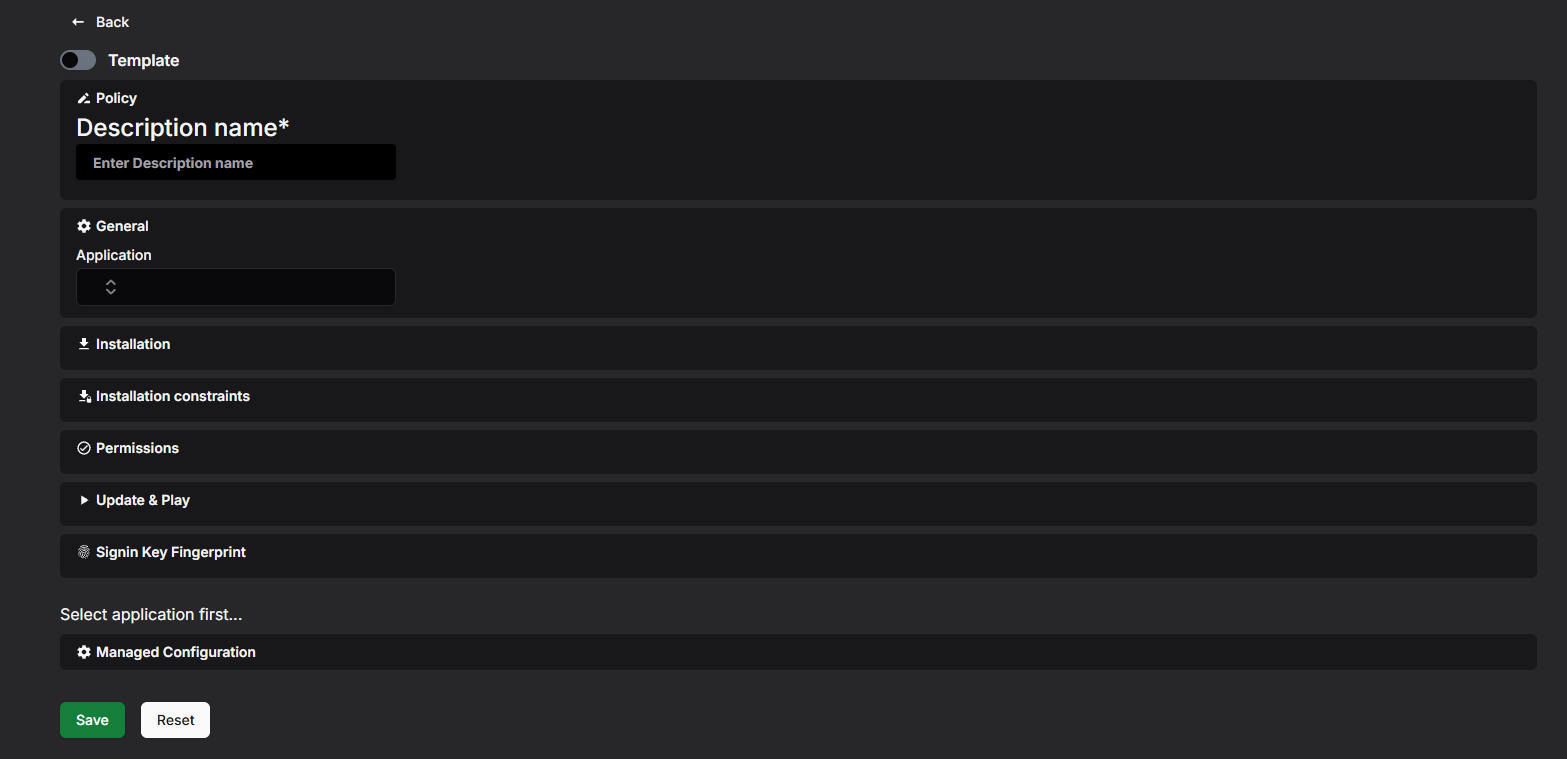
In General, choose the Application. Until you do, the other sections stay empty and the page shows Select application first.... The choice is locked afterwards — a policy always belongs to one app.
-
Fill in the sections described under Settings Reference below. Which fields are available depends on the chosen app and the Install Type; fields that do not apply are shown crossed out and cannot be edited.
-
Optionally pick a Managed Configuration and set per-permission overrides under Permissions (overrides default).
-
Select Save. Reset clears the whole form and starts over.
If something is wrong, an error message appears at the top of the page and the policy is not saved. See Troubleshooting at the end for the most common messages.
What Happens Next?
The new policy appears in the list. It does nothing until you assign it to a device group — see Assigning the Policy to a Device Group further down.
Settings Reference
The option names below are exactly what the dropdowns show.
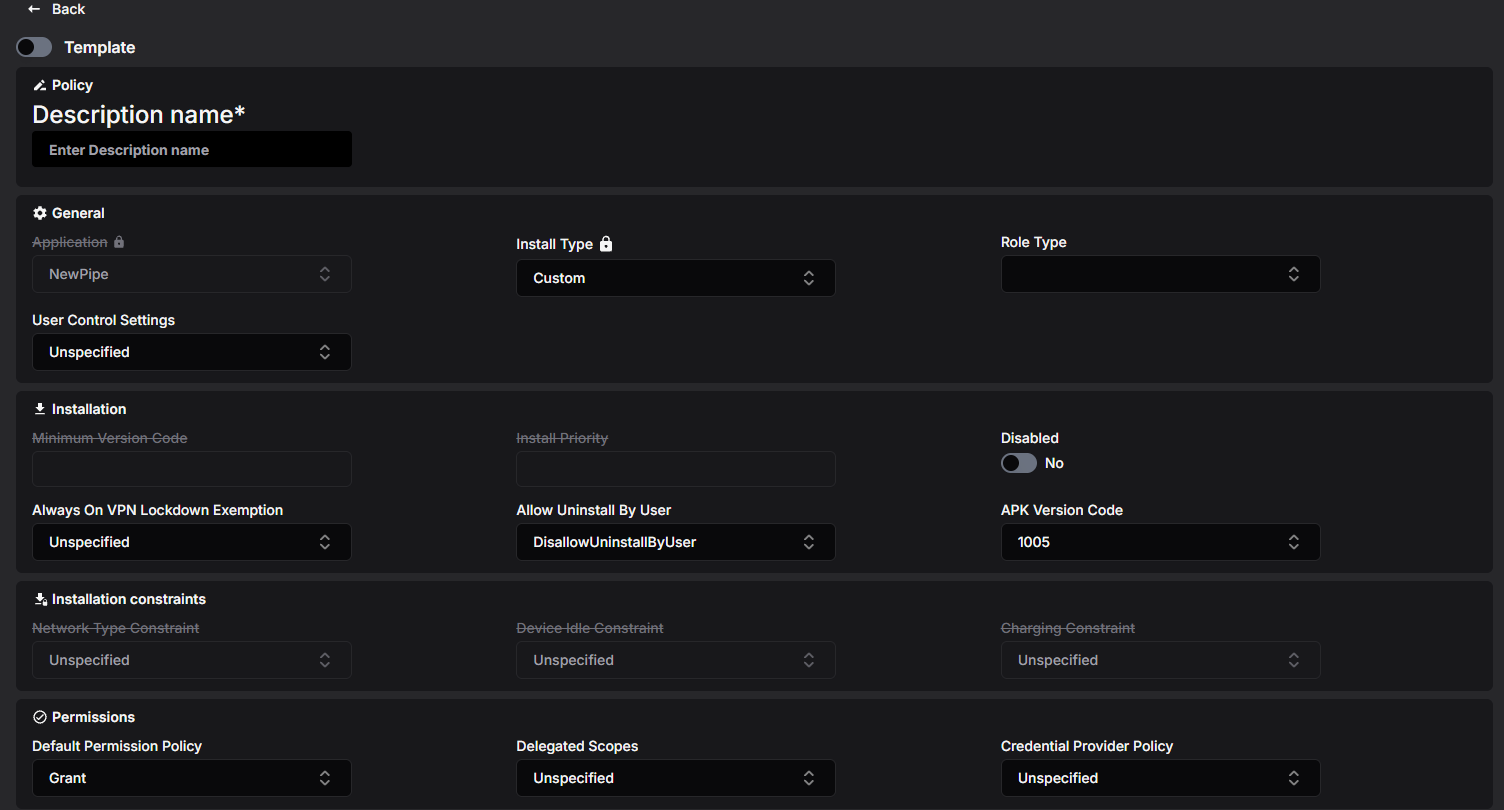
General
Application
The app this policy is about, chosen from the apps in Application List. Locked once selected.
The device management client app is special: when you select it, its role and install type are fixed and cannot be changed.
Install Type
How the app is delivered to the device:
-
Available (default) — the user may install the app from the managed Google Play store.
-
PreInstalled — the app is installed automatically, and the user may remove it.
-
ForceInstalled — the app is installed automatically and the user cannot remove it.
-
RequiredForSetup — the app is installed automatically, cannot be removed, and device setup does not finish until it is installed.
-
Blocked — the app cannot be installed; if it is already on the device, it is uninstalled.
-
Custom — the app is your own uploaded APK, delivered outside Google Play. For an uploaded custom app this is the only choice and is locked; the Play-related fields (minimum version, update mode, tracks, install priority and installation constraints) do not apply. Custom apps work on fully managed devices only.
Role Type
Special roles for the app. You can select several, but only one app in a device group's policies can hold a given role:
-
Kiosk — the app becomes the device's home screen and the device is locked to it; the status bar is disabled. Selecting this switches the Install Type to RequiredForSetup automatically (a custom app keeps Custom). On Android 11 and later, a kiosk also blocks user control (force-stop, clearing data) for every app unless you allow it per app with User Control Settings.
-
CompanionApp — the app works together with the device management software and can keep operating offline. On Android 14 and later it is exempt from battery and background restrictions; users cannot force-stop it or clear its data.
-
SystemHealthMonitoring — for system health monitoring apps. On Android 14 and later the app is exempt from battery and background restrictions; users cannot force-stop it or clear its data.
User Control Settings
Whether the user may force-stop the app and clear its data:
-
Unspecified (default) — the app's normal behaviour: allowed for most apps, blocked for kiosk and companion apps.
-
UserControlAllowed — user control is allowed. Only valid together with the Kiosk role; the other roles always block it.
-
UserControlDisallowed — user control is blocked. Android 11 or later.
Installation
Minimum Version Code
The lowest app version allowed on the device; the device updates the app to at least this version. The version must already be published on Google Play. Not available for custom apps.
Install Priority
Order of installation among the apps that install automatically. Only available for ForceInstalled and PreInstalled apps. 0 (the default) means no priority; values 1–10000 install sooner the lower they are.
Disabled
When Yes, the app is disabled on the device but its data is kept. Use this to switch an app off temporarily without uninstalling it.
Always On VPN Lockdown Exemption
What happens to this app when the device uses an always-on VPN in lockdown mode and the VPN is not connected:
-
VpnLockdownEnforced (default) — the app gets no network access.
-
VpnLockdownExemption — the app may use the network anyway. Android 10 or later.
Allow Uninstall By User
For custom apps only: DisallowUninstallByUser (default for an uploaded app) or AllowUninstallByUser.
APK Version Code
For custom apps only: which uploaded version of the APK is delivered. The newest uploaded version is selected automatically. Changing it also reloads the permission list in Permissions (overrides default), so re-check your selections there.
Installation constraints
Conditions the device waits for before installing the app. Only available for ForceInstalled and PreInstalled apps.
-
Network Type Constraint — InstallOnAnyNetwork (default) or InstallOnlyOnUnmeteredNetwork (for example Wi-Fi, to avoid mobile data charges).
-
Device Idle Constraint — DeviceIdleNotRequired (default) or InstallOnlyWhenDeviceIdle (wait until the device is not being used).
-
Charging Constraint — ChargingNotRequired (default) or InstallOnlyWhenCharging.
Permissions
Default Permission Policy
What happens when this app asks for a permission (location, camera, and so on):
-
Grant — permissions are granted automatically. On Android 12 and later, location, camera, microphone and other sensor permissions can only be granted automatically on fully managed devices.
-
Prompt — the user is asked.
-
Deny — permissions are denied automatically.
Individual permissions can be overridden in Permissions (overrides default) at the bottom of the page.
Delegated Scopes
Extra management privileges handed to this app. You can select several: for example CertInstall (install and manage certificates), ManagedConfigurations (manage other apps' configurations), BlockUninstall, PermissionGrant, PackageAccess, EnableSystemApp, NetworkActivityLogs, SecurityLogs and CertSelection. The log and certificate-selection scopes can be held by only one app at a time; network logs need Android 10 or later and security logs Android 12 or later. Grant these only to apps you trust — they give the app real control over the device.
Credential Provider Policy
CredentialProviderAllowed lets the app act as a credential (password/passkey) provider on Android 14 and later. Leave Unspecified to use the device default.
Update & Play
Not available for custom apps.
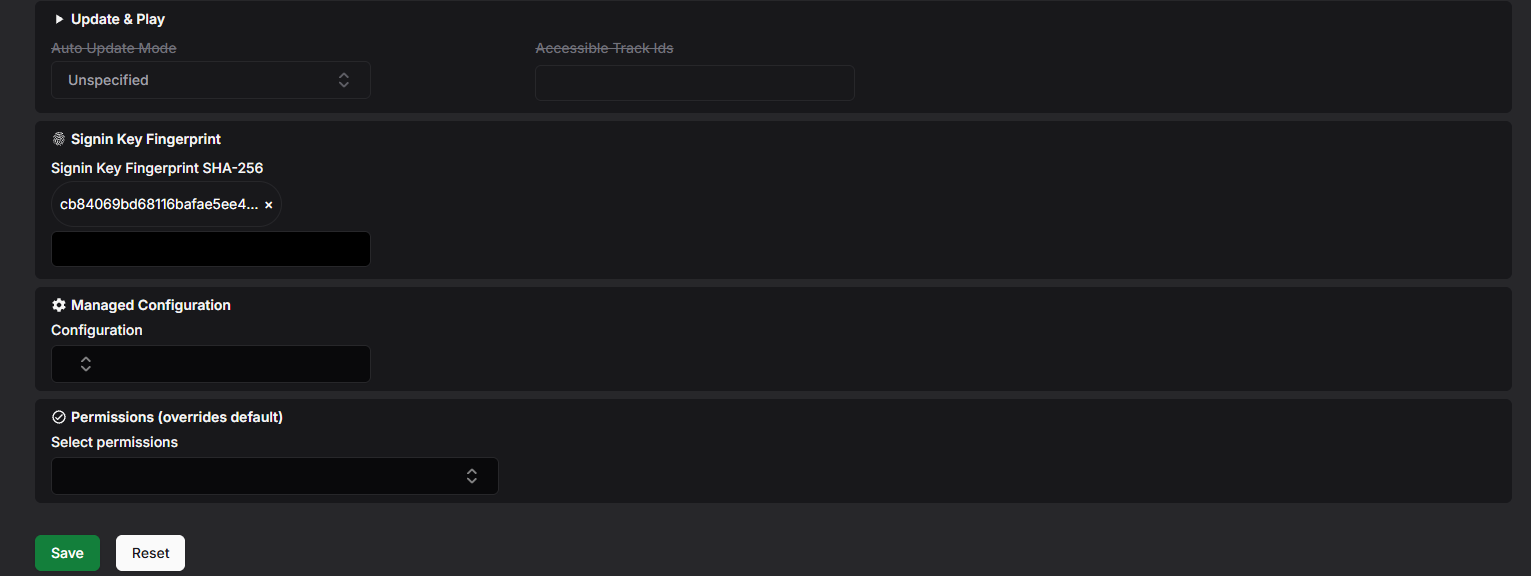
Auto Update Mode
-
AutoUpdateDefault — the app updates with low priority: when the device is idle, charging and on an unmetered network, and the app is not in the foreground.
-
AutoUpdatePostponed — the app is not auto-updated for up to 90 days after it becomes out of date; the user can still update it manually from Play.
-
AutoUpdateHighPriority — the app updates as soon as possible after a new version is available.
Accessible Track Ids
Google Play track IDs (for example internal or beta test tracks) the devices may receive this app from. Type an ID and press Enter or , to add it. Left empty, devices only get the production track.
Signin Key Fingerprint
Signin Key Fingerprint SHA-256 holds the SHA-256 fingerprints of the app's signing certificate. For a custom app they are filled in automatically from the uploaded APK, and a custom app cannot be saved without one. The device checks the installed app against these fingerprints. For Play apps the field is not editable.
Managed Configuration
Pre-filled settings for the app, chosen from the managed configurations created for this app under Managed Configurations. Pick one in the Configuration dropdown. If the configuration contains placeholder values (written as %placeholder%), an input appears for each placeholder so you can fill in the policy-specific value.
A managed configuration cannot be picked while saving the policy as a template.
Permissions (overrides default)
Per-permission exceptions to the Default Permission Policy. This section appears once the app is selected and its permissions are known.
-
Open Select permissions and tick the permissions you want to override.
-
For each selected permission, choose Grant, Prompt or Deny.
Viewing and Editing a Policy
-
In the policy list, select the eye button on the row you want to open.
-
If the policy is in use, Assigned to: at the top lists the device groups; each name is a link to that group.
-
Select Edit.
-
Change the settings. Select Save to keep the changes or Cancel to discard them.
The Application cannot be changed afterwards — create a new policy for a different app. Devices receive the updated settings through the device groups the policy is assigned to.
Copying a Policy
-
Select the copy button — either on the row in the list or at the bottom of an open policy.
-
In Enter display name for new copy, type a name of at least 3 characters.
-
Select Copy.
The copy keeps the app, all settings, the managed configuration choice and the permission overrides. When you copy from an open policy, the copy is opened for you.
Templates
Administrators can save a policy as a global template with your organisation's preferred settings, and anyone can start a new policy from one with Create → Create from template +. See the Policy Templates manual. Note that a managed configuration cannot be included in an application policy template.
Deleting a Policy
-
In the policy list, select the trash button on the row.
-
Confirm with Delete in the Confirm deletion dialog.
A policy that is still in use cannot be deleted. Remove it from the device groups that use it first.
Assigning the Policy to a Device Group
-
Open Device Groups and create a group or open an existing one.
-
Add the policy in the Applications selection.
-
Save the group.
A device group can use many application policies — one per app — and the same policy can be used by any number of groups.
Minimum Android Version
Each policy shows a Min Android value in the list — the oldest Android version a device needs in order to apply everything in the policy:
-
Nothing beyond the defaults — Android 6
-
User Control Settings = UserControlDisallowed — Android 11
Individual options may additionally behave differently on older devices, as noted in the settings reference above.