Device Function Policy
A Device Function policy controls everyday device features on the devices in a device group:
-
connectivity features such as Bluetooth, VPN and mobile network settings, data roaming and NFC sharing
-
location services and location sharing
-
phone calls and SMS messages
-
security-related features such as the microphone, USB file transfer and credential settings
-
screen behaviour while charging, printing, date and time settings, and a message shown on the lock screen
You create the policy once and assign it to one or more device groups. Every device in those groups receives the same settings.
Before You Start
-
You need the Admin, Editor, Enterprise Admin or Enterprise Editor role to create, edit, copy or delete policies. Viewers can only open and read them. See User Roles in the manual index.
-
Most settings work on any managed device, but a few apply only to fully managed devices or need a minimum Android version — these are noted in the settings reference below. The policy list shows the computed Min Android value for each policy.
Where to Find It
Open Policies in the left-hand menu and select Device Function.
The list shows every policy in the enterprise with its Display name, the Assigned Device Groups and the Min Android version it requires. Use the Name filter and Search to narrow the list, and the page controls above and below the table to move between pages. Each row has view, copy and delete buttons.
How to Create a Policy
-
Open Policies → Device Function.
-
Select Create, then Create new + (or Create from template + to start from a template — see the Policy Templates manual).
-
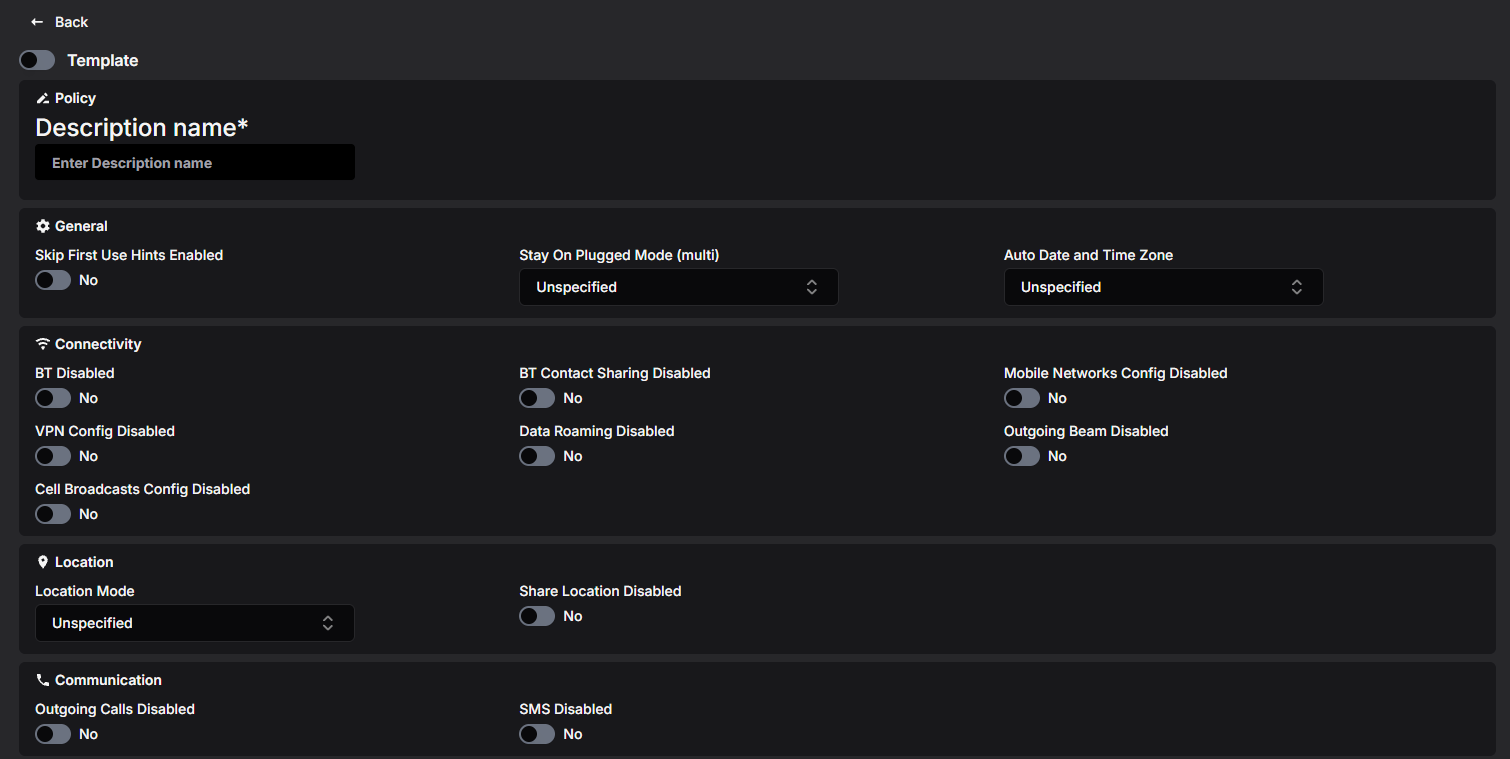
Enter a Description Name. This is required and must be unique within the enterprise.
-
Go through the sections described under Settings Reference below. Every switch starts as No and every dropdown as Unspecified, which means "do not manage this setting" (except Location Mode) — the device keeps its default behaviour. Only change the settings you actually want to enforce.
-
Optionally add a lock screen message — see Lock Screen Info below.
-
Select Save.
If something is wrong, an error message appears at the top of the page and the policy is not saved. See Troubleshooting at the end for the most common messages.
What Happens Next?
The new policy appears in the list. It does nothing until you assign it to a device group — see Assigning the Policy to a Device Group further down.
Settings Reference
Most settings are switches: No leaves the feature alone, Yes disables or enforces it as described. The option names below are exactly what the dropdowns show.
General
Skip First Use Hints Enabled
When Yes, the device recommends that apps skip their user tutorials and other introductory hints on first start-up. Useful for kiosk and single-purpose devices where the hints only get in the way.
Stay On Plugged Mode (multi)
Keeps the screen on while the device is connected to the selected power sources. You can select several: AC (charger), USB and Wireless. Leave unselected to let the screen turn off normally.
Auto Date and Time Zone
-
AutoDateAndTimeZoneUserChoice (default) — the user controls automatic date, time and time zone.
-
AutoDateAndTimeZoneEnforced — automatic date, time and time zone are forced on; the user cannot set them manually.
Connectivity
-
BT Disabled — turns Bluetooth off entirely.
-
BT Contact Sharing Disabled — blocks sharing contacts over Bluetooth (for example with a car kit).
-
Mobile Networks Config Disabled — the user cannot change mobile network settings.
-
VPN Config Disabled — the user cannot configure VPNs.
-
Data Roaming Disabled — mobile data cannot be used while roaming.
-
Outgoing Beam Disabled — blocks sending data from apps over NFC.
-
Cell Broadcasts Config Disabled — the user cannot change cell broadcast (emergency alert) settings.
Location
Location Mode
- LocationEnforced (default) — location services are forced on.
-
LocationUserChoice — location is not restricted; the user decides.
-
LocationDisabled — location services are forced off.
Note: on work profiles on company-owned devices running Android 11 or later, the device cannot switch location on or off by itself — the device is reported as non-compliant until the user changes the location setting themselves.
When Yes, location sharing is blocked.
Communication
-
Outgoing Calls Disabled — the device cannot make outgoing calls.
-
SMS Disabled — the device cannot send or receive SMS messages.
Device Security
Credentials Config Disabled
When Yes, the user cannot manage user credentials (such as installed certificates).
USB File Transfer Disabled
When Yes, transferring files over USB is blocked. Works on company-owned devices. For finer USB control, see USB Data Access in the Network and Connectivity policy.
Microphone Access
Controls the microphone on fully managed devices (no effect on other devices):
-
MicrophoneAccessUserChoice (default) — the microphone is available; on Android 12 and later the user can use the microphone access toggle.
-
MicrophoneAccessDisabled — the microphone is disabled device-wide.
-
MicrophoneAccessEnforced — the microphone is available and, on Android 12 and later, the user cannot turn it off with the microphone access toggle.
Network Reset Disabled
When Yes, the user cannot use the "reset network settings" function. Fully managed devices only.
System & User interface
Create Windows Disabled
When Yes, apps cannot create windows on top of other apps (overlays). This prevents pop-up style windows from covering the screen.
Printing Policy
-
PrintingAllowed (default) — the user may print.
-
PrintingDisallowed — printing is blocked. Android 9 or later.
Lock Screen Info
A text shown on the device's lock screen — for example the company name and a phone number for returning a lost device.
-
Select + Add Lock Screen Info.
-
Enter the text in Default Text.
Select Delete to remove the message again.
Viewing and Editing a Policy
-
In the policy list, select the eye button on the row you want to open.
-
If the policy is in use, Assigned to: at the top lists the device groups; each name is a link to that group.
-
Select Edit.
-
Change the settings. Select Save to keep the changes or Cancel to discard them.
Devices receive the updated settings through the device groups the policy is assigned to.

Copying a Policy
-
Select the copy button — either on the row in the list or at the bottom of an open policy.
-
In Enter display name for new copy, type a name of at least 3 characters.
-
Select Copy.
The copy contains every setting of the original, including the lock screen message. When you copy from an open policy, the copy is opened for you.
Templates
Administrators can save a policy as a global template with your organisation's preferred settings, and anyone can start a new policy from one with Create → Create from template +. See the Policy Templates manual.
Deleting a Policy
-
In the policy list, select the trash button on the row.
-
Confirm with Delete in the Confirm deletion dialog.
A policy that is still assigned to a device group cannot be deleted. Remove it from the group first.
Assigning the Policy to a Device Group
-
Open Device Groups and create a group or open an existing one.
-
In Device Functions, select the policy.
-
Save the group.
A device group can have one Device Function policy; a policy can be used by any number of groups. The Device Function column in the device group list shows which policy each group uses.
Minimum Android Version
Each policy shows a Min Android value in the list — the oldest Android version a device needs in order to apply everything in the policy:
-
Nothing beyond the defaults — Android 6
-
Printing Policy = PrintingDisallowed — Android 9
Individual options may additionally behave differently on older devices, as noted in the settings reference above.