Interaction policy
An Interaction policy controls how users interact with the devices in a device group:
-
kiosk behaviour — locking the device down and deciding what the user can still reach (power menu, navigation buttons, status bar, settings)
-
display behaviour — wallpaper, screen brightness and screen timeout
-
support messages shown to the user where the administrator has disabled something
-
a setup action: an app that is launched while the device is being set up
You create the policy once and assign it to one or more device groups. Every device in those groups receives the same settings.
Before You Start
-
You need the Admin, Editor, Enterprise Admin or Enterprise Editor role to create, edit, copy or delete policies. Viewers can only open and read them. See User Roles in the manual index.
-
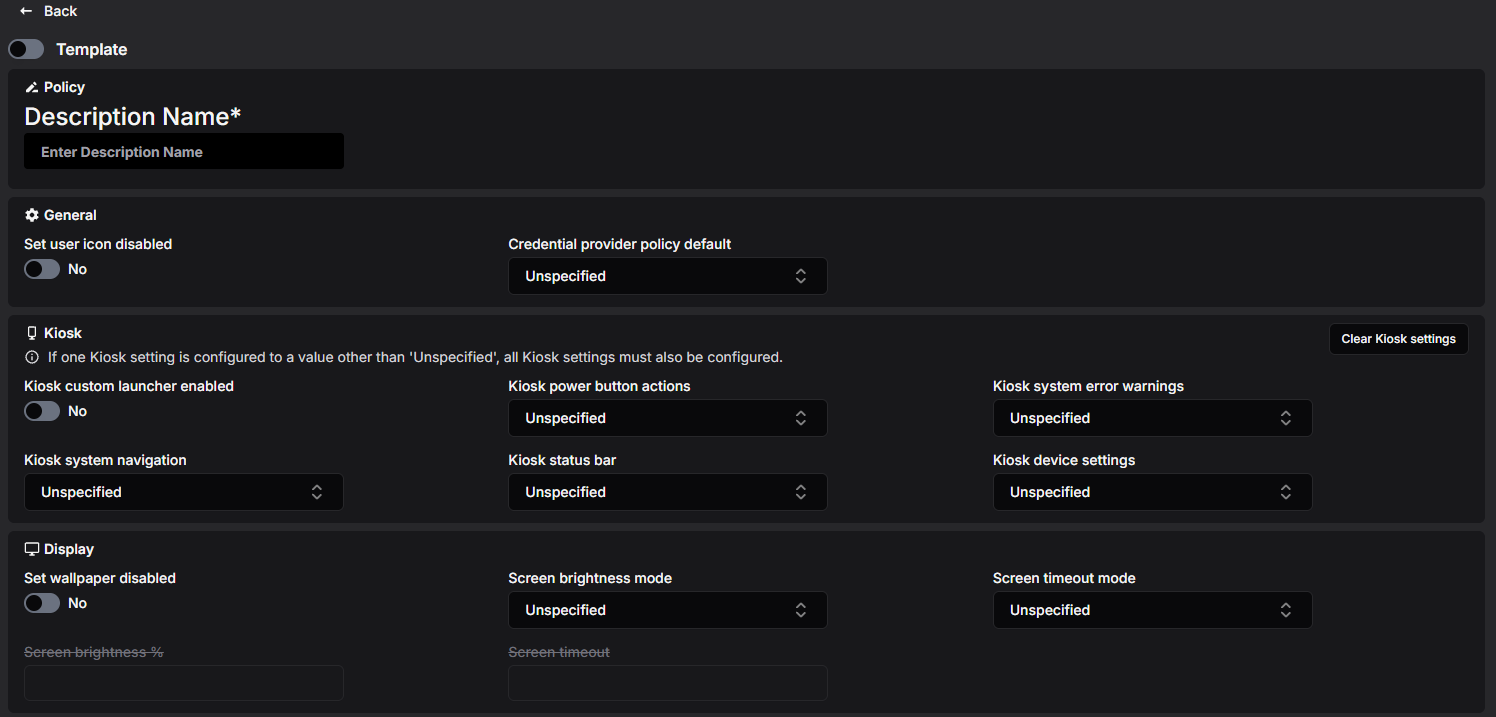
The Kiosk settings are all-or-nothing: as the form itself notes, if one Kiosk setting is configured to a value other than 'Unspecified', all Kiosk settings must also be configured.
-
Enforcing screen brightness or screen timeout needs Android 9 or later — the policy list shows the computed Min Android value for each policy.
Where to Find It
Open Policies in the left-hand menu and select Interaction.
The list shows every policy in the enterprise with its Display name, the Assigned Device Groups and the Min Android version it requires. Use the Name filter and Search to narrow the list. Each row has view, copy and delete buttons.
How to Create a Policy
-
Open Policies → Interaction.
-
Select Create, then Create new + (or Create from template + to start from a template — see the Policy Templates manual).
-
Enter a Description Name. This is required and must be unique within the enterprise.
-
Fill in the General, Kiosk and Display sections — see Settings Reference below. Switches start as No and dropdowns as Unspecified, which means "do not manage this setting".
-
Optionally add Support Messages and a Setup Action — see below.
-
Select Save Policy.
If something is wrong, an error message appears at the top of the page and the policy is not saved. See Troubleshooting at the end for the most common messages.
What Happens Next?
The new policy appears in the list. It does nothing until you assign it to a device group — see Assigning the Policy to a Device Group further down.
Settings Reference
The option names below are exactly what the dropdowns show.
General
Set user icon disabled
When Yes, the user cannot change the user icon. Android 7 or later.
Credential provider policy default
Whether apps may act as credential (password/passkey) providers on Android 14 and later, when the app's own Application policy does not say otherwise:
-
CredentialProviderDefaultDisallowed (default when Unspecified) — such apps may not act as credential providers.
-
CredentialProviderDefaultDisallowedExceptSystem — such apps may not act as credential providers, except the device maker's default ones.
-
CredentialProviderDefaultAllowed — such apps may act as credential providers.
Kiosk
These settings control a device running in kiosk mode. A device enters kiosk mode either through an app with the Kiosk role (see the Application Policy manual) or by turning on Kiosk custom launcher enabled here.
Remember: set either none or all of the Kiosk dropdowns. The Clear Kiosk settings button at the top right of the section resets them all back to Unspecified.
Kiosk custom launcher enabled
When Yes, the device's home screen is replaced with a launcher that locks the device down to the apps delivered through Application policies, shown on a single page in alphabetical order. Use this for a multi-app kiosk; for a single-app kiosk, give that app the Kiosk role instead.
Kiosk system error warnings
-
ErrorWarningsEnabled — system error dialogs (app crash, app not responding) are shown.
-
ErrorWarningsMuted (default) — error dialogs are hidden; a crashed or unresponsive app is force-stopped silently.
Kiosk status bar
-
NotificationsAndSystemInfoEnabled — the status bar shows system info and notifications. Requires Kiosk system navigation to be NavigationEnabled or HomeButtonOnly.
-
NotificationsAndSystemInfoDisabled (default) — the status bar is disabled.
-
SystemInfoOnly — only system info (clock, battery) is shown.
Kiosk device settings
-
SettingsAccessAllowed (default) — the Settings app can be opened in kiosk mode.
-
SettingsAccessBlocked — the Settings app is blocked.
Display
Set wallpaper disabled
When Yes, the user cannot change the wallpaper.
Screen brightness mode and Screen brightness %
-
BrightnessUserChoice (default) — the user controls the brightness; the brightness value must be left empty.
-
BrightnessAutomatic — brightness adjusts automatically and the user cannot change it; a Screen brightness % value (1–100) is taken into account in the automatic adjustment.
-
BrightnessFixed — brightness is fixed to Screen brightness % (1–100, required) and the user cannot change it.
Automatic and Fixed need Android 9 or later on fully managed devices (Android 15 or later on work profiles on company-owned devices).
Screen timeout mode and Screen timeout
-
ScreenTimeoutUserChoice (default) — the user controls the screen timeout; the timeout value must be left empty.
-
ScreenTimeoutEnforced — the screen turns off after Screen timeout seconds (required) and the user cannot change it. Same device and Android version support as the brightness enforcement above.
Support Messages
Messages shown to the device user in the settings screens. Select + Add Support Message to add them; this creates two messages, each with a Default Text and a Description Name:
-
the first is the short support message, shown wherever a feature has been disabled by the administrator (texts longer than 200 characters may be cut off)
-
the second is the long support message, shown in the device administrator's settings screen
Select the delete button to remove both messages again.

Setup Action
A setup action launches a chosen app while the device is being set up — for example an app that guides the user through enrolment. Only one setup action can be configured.
-
Select + Add Setup Action.
-
In Launch app, pick the app to launch. In the device group where this policy is used, that app must be delivered with install type RequiredForSetup.
-
Adjust the Setup Action Title and Setup Action Description texts shown to the user during setup (pre-filled with "App Launch" / "The app will launch automatically").
Select the delete button to remove the setup action.
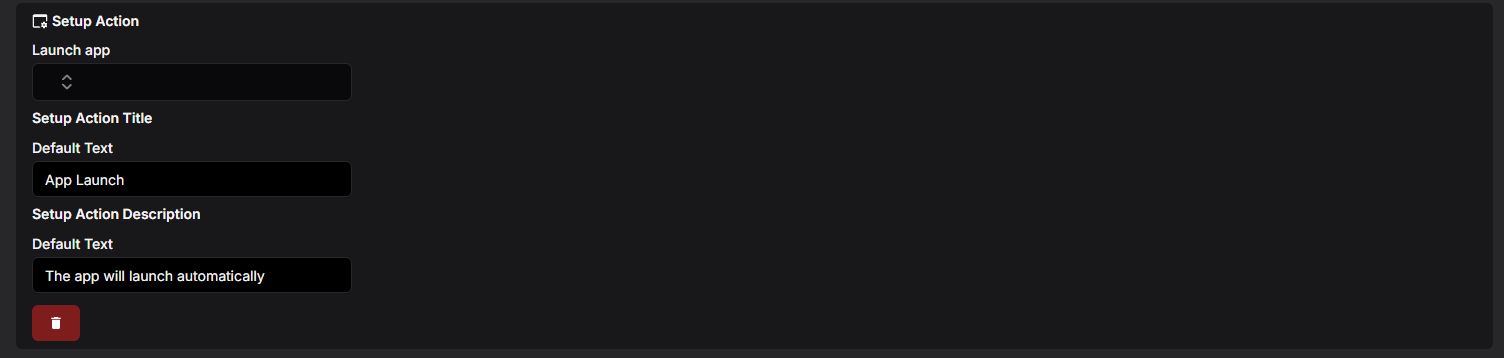
Note: if the device management client app is used in the device group, the setup action configured here is omitted entirely — the system replaces it with its own setup action that launches the client during setup.
Viewing and Editing a Policy
-
In the policy list, select the eye button on the row you want to open.
-
If the policy is in use, Assigned to: at the top lists the device groups; each name is a link to that group.
-
Select Edit.
-
Change the settings — support messages and the setup action can be added, changed and deleted here too. Select Save to keep the changes or Cancel to discard them.
Devices receive the updated settings through the device groups the policy is assigned to.

Copying a Policy
-
Select the copy button — either on the row in the list or at the bottom of an open policy.
-
In Enter display name for new copy, type a name of at least 3 characters.
-
Select Copy.
The copy contains every setting, the support messages and the setup action of the original. When you copy from an open policy, the copy is opened for you.
Templates
Administrators can save a policy as a global template with your organisation's preferred settings, and anyone can start a new policy from one with Create → Create from template +. See the Policy Templates manual.
Deleting a Policy
-
In the policy list, select the trash button on the row.
-
Confirm with Delete in the Confirm deletion dialog.
A policy that is still assigned to a device group cannot be deleted. Remove it from the group first.
Assigning the Policy to a Device Group
-
Open Device Groups and create a group or open an existing one.
-
In Interaction Policy, select the policy.
-
Save the group.
A device group can have one Interaction policy; a policy can be used by any number of groups. The Interaction column in the device group list shows which policy each group uses.
Minimum Android Version
Each policy shows a Min Android value in the list — the oldest Android version a device needs in order to apply everything in the policy:
-
Nothing beyond the defaults — Android 6
-
Screen brightness mode = BrightnessAutomatic or BrightnessFixed, or a Screen brightness % value — Android 9
-
Screen timeout mode = ScreenTimeoutEnforced, or a Screen timeout value — Android 9