Getting Started
- What is KMM?
- Quick Start Guide
- Enrollment
- Zero-touch / Enrollment
- KMM Client
- Application Management
- Custom APK to Kiosk
What is KMM?
KMM (Kuori Mobility Management) is an Android Enterprise Mobility Management (EMM) solution designed for managing Fully Managed Android devices. KMM provides organizations with centralized control over corporate-owned devices, allowing administrators to securely configure, manage, monitor, and deploy Android devices at scale.
KMM integrates directly with Google Android Enterprise services, including Managed Google Play and the Android Management API (AMAPI). Through these integrations, KMM can manage applications, device policies, security settings, and device configurations using Google’s officially supported Android Enterprise framework.
Device policies created in KMM are distributed to devices through the Android Management API. These policies can include application management, device restrictions, password requirements, kiosk configurations, network settings, and other enterprise device management features commonly required for Fully Managed deployments.
Application distribution and lifecycle management are handled through Managed Google Play integration. Administrators can approve public applications from Google Play, upload private applications, manage application permissions, and silently deploy applications directly to managed devices.
KMM supports the core functionality expected from a modern Android EMM solution for Fully Managed devices, including:
- Device enrollment and provisioning
- Application management and distribution
- Device policy management
- Kiosk and dedicated device configurations
- Remote device management actions
-
Live client connection status and device location map (through the KMM Client app)
-
Bulk actions on many devices at once
- Security and compliance controls
- Device grouping and policy assignment
- Android Enterprise integrations
- Live client connection status and device location map (through the KMM Client app)
- Bulk actions on many devices at once
In May 2025, Kuori successfully passed the Android Enterprise EMM Product Review for the Fully Managed Device solution set. As part of this approval, Kuori received authorization for production deployment, allowing KMM to be publicly deployed to customer environments as an officially reviewed Android Enterprise EMM solution.
Quick Start Guide
This quick start guide focuses on managing application distribution via KMM by selecting an application, creating your first application policy, and creating your first device group. This guide is intended for situations where your device or devices are already enrolled in the enterprise that you administer.
In KMM, once an enterprise is selected, navigation is handled through the menu on the left side of the screen. From there, users can create new policies, manage devices, create device groups, manage applications, and more.

Creating and Applying Your First Policy
First, select an application to get started. Navigate to the Application List view from the left-side menu.

At the top of the view, select Add+ to choose an application from the Google Play Store, or select Upload APK+ to upload a custom APK package.

In this guide we will be selecting an LinkedIn application via the Google Play Store.

After selecting the application, navigate back to the Application List view and verify that the application appears in the list.

Next, create an application policy. Navigate to Policies > Applications from the left-side menu. Select Create at the top of the page, then select Create New +.

You can now select the application you just added from the dropdown menu. Fill in the Name ID field (Description name) for your new policy. Depending on the application, you may also want to modify some configuration settings. Once finished, press the Save button at the bottom of the page.

Creating a Device Group
Now that the application policy has been created, you need a device group where the policy will be applied. Navigate to the Device Groups page and press Create +.

Fill in the Name ID field. Note that the Name ID cannot contain whitespace characters. Under Applications, select the application policy you just created.
here.
Finally, press Save.
Assigning a Device to the Device Group
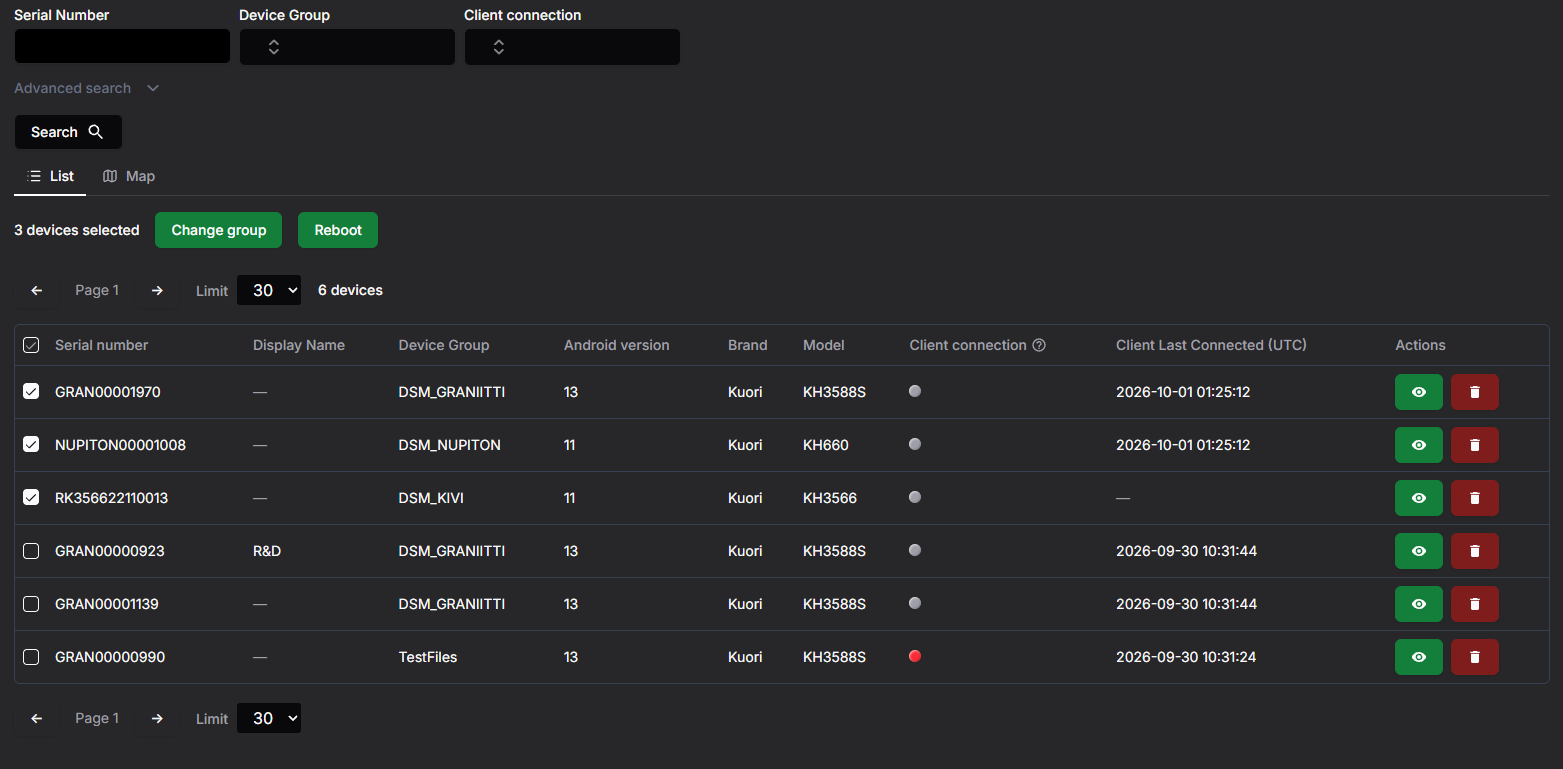
The final step is to attach a device to the newly created device group.
After saving, KMM sends the updated policy information to Google AMAPI. Within approximately 10 minutes, the device will retrieve the updated policy and apply the required changes automatically.


Summary
In this guide, we went through the basic workflow for distributing applications with KMM. We selected an application, created an application policy, created a device group, and finally assigned a device to that group so the policy could be applied automatically.
This example demonstrates the basic concepts of how KMM policies, applications, and device groups work together. In a real production environment, device enrollment is typically handled through automated enrollment methods such as Zero-touch Enrollment or enrollment tokens.
You can read more about automated enrollment methods here.
These enrollment methods allow devices to automatically enroll into KMM during setup, making large-scale deployments significantly easier and more efficient.
Enrollment
What does this do?
Enrollment is how an Android device joins KMM. During enrollment the device installs Android Device Policy, connects to your enterprise and lands in the device group you chose. From then on the device receives the policies, applications and settings of that group.
KMM supports three ways to enroll a device. All three start from the same thing: an enrollment token created in KMM.
- Zero-touch enrollment. The device enrolls by itself the first time it is switched on and connected to the internet. Nothing is typed on the device.
- QR code enrollment. The person setting up the device scans a QR code shown in KMM.
- Token enrollment. The person setting up the device types the token code shown in KMM.
Zero-touch is meant for fleets of new devices bought from a zero-touch reseller. QR code and token enrollment are meant for devices you set up by hand, one at a time.
Before You Start
- You need an editor or admin role to create or delete enrollment tokens. Viewers can open the page but cannot change anything.
- The device group the devices should join must already exist. Create it under Device Groups first.
- The device must be new or factory reset. Enrollment happens during the Android setup wizard and cannot be done on a device that is already in use.
- For zero-touch, the device must have been bought through a zero-touch reseller and be registered to your company in the zero-touch portal. Kuori manages the zero-touch portal on your behalf.
Zero-touch and manual enrollment do not mix
A device that is registered for zero-touch always enrolls through zero-touch. When such a device is switched on, Android fetches the zero-touch configuration before the setup wizard offers any other choice. You cannot skip it, scan a QR code or type a token on that device.
If you need to enroll a zero-touch device with a QR code or a token instead, ask your KMM administrators to remove the device from zero-touch first. Once the device has been removed, factory reset it and proceed with QR code or token enrollment as described below.
Creating an Enrollment Token
Every enrollment method needs a token, so create one first.
- Open Enrollment Tokens in the side menu.
- Select Create +.
- Enter a Display Name so you recognize the token later.
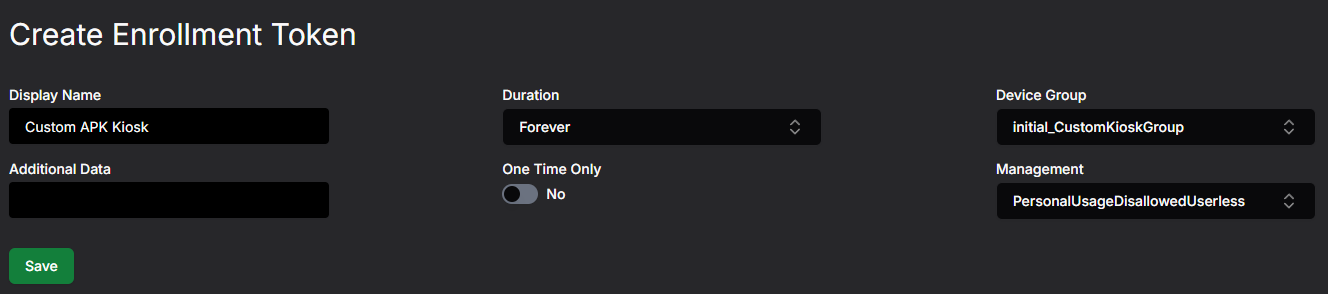
- Choose a Duration. This is how long the token stays valid, from half an hour up to five years, or Forever. Devices enrolled with the token stay enrolled after the token expires; only new enrollments stop.
- Choose the Device Group the enrolled devices should join.
- Additional Data is optional text saved with the token. You can leave it empty.
- Switch One Time Only on if the token may be used for exactly one device. Leave it off for a token you will use for many devices.
- Management and Required Account Email are only available for a Domain-Managed Enterprise. For other enterprises they are shown crossed out and the default is used. If you need them, upgrade the enterprise via the Enterprise page first.
- Management and Required Account Email only works with domains where Enterprise has been binded to. For example if enterprise is binded to kuori.tech domain, only @kuori.tech emails will work with this.
- Select Save.
The new token appears as a card on the Enrollment Tokens page. The card shows:
- Expiration as a UTC time.
- Personal Usage, Required Account Email and Device Group as chosen when the token was created.
- Token, the code used for token enrollment.
- QR Code, collapsed by default. Select the heading to show the code.
- Zero Touch DPC Extras, the text Kuori needs for zero-touch, with a Copy to clipboard button.
An expired token shows an Expired badge at the top of its card. Editors and admins can delete a token with the red delete button. Deleting a token does not unenroll devices that already used it.
Zero-touch Enrollment
With zero-touch the enrollment token is applied to the devices by Kuori, not on the device itself.
- Create an enrollment token as described above. Use a long Duration or Forever, and leave One Time Only off, so the same token works for every device in the batch.
- On the token card, select Copy to clipboard under Zero Touch DPC Extras.
- Send the copied text to Kuori together with the list of devices that should use it. Kuori adds the configuration to your company in the zero-touch portal and assigns it to your devices.
- Hand the devices to their users. When a device is switched on for the first time and connects to Wi-Fi or mobile data, it enrolls into the device group of the token without anyone doing anything on the device.
If a device was bought as zero-touch but has not been registered to your company yet, give Kuori the device serial numbers, manufacturer and model.
QR Code Enrollment
Use this when you set up devices by hand and have KMM open on a screen next to you.
- Create an enrollment token as described above, or open an existing one that has not expired.
- On the token card, select the QR Code heading to show the code.
- Factory reset the device if it is not new, then switch it on.
- On the Android Welcome screen, tap the same spot on the screen six times or in the email field, enter
afw#setupand continue - The device asks to connect to Wi-Fi and then opens the QR code scanner. On some devices the scanner is offered directly on the Welcome screen.
- Scan the QR code shown in KMM.
- Follow the steps on the device. The device installs Android Device Policy, enrolls into KMM and applies the device group of the token.
Token Enrollment
Use this when you cannot scan a QR code, for example when the device has no camera or when you are giving instructions over the phone.
- Create an enrollment token as described above, or open an existing one that has not expired.
- Note the code shown under Token on the token card.
- Factory reset the device if it is not new, then switch it on.
- Go through the Android setup wizard until the Google sign-in screen.
- In the email field, enter
afw#setupand continue. The device installs Android Device Policy. - When asked for the enrollment code, type the Token exactly as shown in KMM.
- Follow the remaining steps on the device. The device enrolls into KMM and applies the device group of the token.
Zero-touch / Enrollment
Zero-touch enrollment is a deployment method that allows organizations to automatically configure and manage corporate devices right out of the box.
When a user powers on a new device and connects to the internet, it automatically downloads enterprise policies, apps, and security settings with no manual IT setup required.
Enrolling devices with Zero-touch
First, create an enrollment token in KMM

Then you need to either have access to Zero-touch customer portal, or give the token to someone who has access to it.
Kuori usually manages zero touch portal and handles the initial device enrollment through it.
Zero-touch customer portal
Add Configuration: Go to the Configurations tab.
-
Set the EMM DPC: Select your MDM application/agent (or
Android Device Policy) as the EMM DPC.
-
Add DPC Extras: Paste the JSON or setup token generated from your EMM dashboard into the DPC Extras box.
-
Assign: Save the configuration and either set it as your Default profile or manually apply it to specific devices using their serial number in the Devices tab
KMM Client
KMM Client is a KMM Extension App. KMM Client extends the standard capabilities of Android Management API by enabling additional device management features directly on managed Android devices.
The application runs in the background on enrolled devices and allows KMM to perform advanced management actions that are not available through standard Android Management API policies alone.
Some of the features require a separate Kuori Security Service application that is available in Managed Google Play. This service provides privileged access to specific Android system APIs that are not available to standard Android applications.
The following sections describe the available features and how to enable KMM Client on enrolled devices.
Features
-
Device online status
0.1.0-
Pings KMM to tell if Client is currently active
-
-
Background image change
0.1.0-
Change background image via managed configurations
-
-
Enabling gesture navigation
0.1.0Requires Security Service-
Gesture navigation set on/off via managed configurations
-
-
Custom application installation (APK)
0.2.0-
Get and install desired custom APKs from the server
-
-
Screen capture (screenshot)
0.2.0Requires Security Service-
Server requests a screenshot and client sends image to the server
-
-
Setting of landscape/portrait mode
0.2.0Requires Security Service-
Display Rotation set via managed configurations
-
-
File upload from the server
0.3.0-
Upload files to specific locations on the device
-
-
Automatically wake DSM client (if installed)
0.3.0-
KMM Client detects if DSM Client is installed and wakes it via broadcast
-
- Device location
0.6.0
-
KMM Client reports the device position; KMM shows it on the device map and on the device page's Location tab.
-
How to enable KMM Client
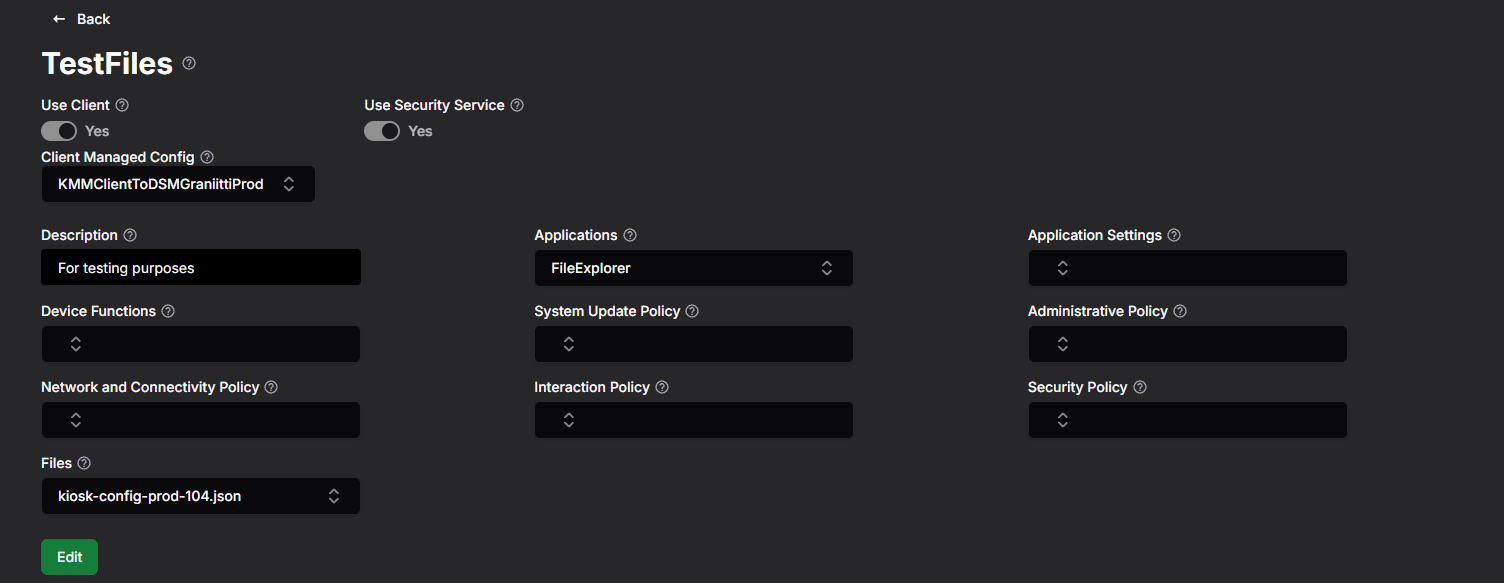
When creating a Device Group, the Use Client option is enabled by default. Enabling this option automatically adds the KMM Client and required Setup Action to the new device group. The Use Security Service option is disabled on default. Enabling this option automatically adds the Kuori Security Service to the new device group. These applications are added to the KMM enterprise by default.
A Managed Configuration for the Client must also be selected. Default managed configuration is selected automatically. Custom managed configurations can also be created to modify the behavior and settings of the Client. These configuration options are described in detail in the following Features section.
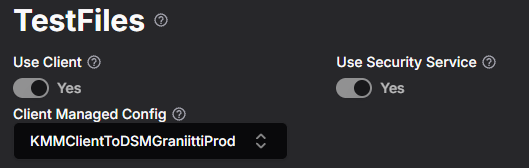
Note: You can also manually create Application Policies for KMM Client and Security Service and Interaction Policy for the Setup Action, but this is the preferred way.
Adding Custom Managed Configurations
To add custom Managed Configurations, you need API key for KMM Client. Navigate to API Keys from the side navigation and click Create new API key:

Enter display name for the API key (this can not be edited later). Also save the actual API key to somewhere secure, you won’t be able to see it again.

You can choose to edit existing one or create a new one. To Create new, click the Create button:
Choose KMM Client from the package name dropdown:

Enter description name for the configuration and select the settings you want to configure (API key is mandatory).
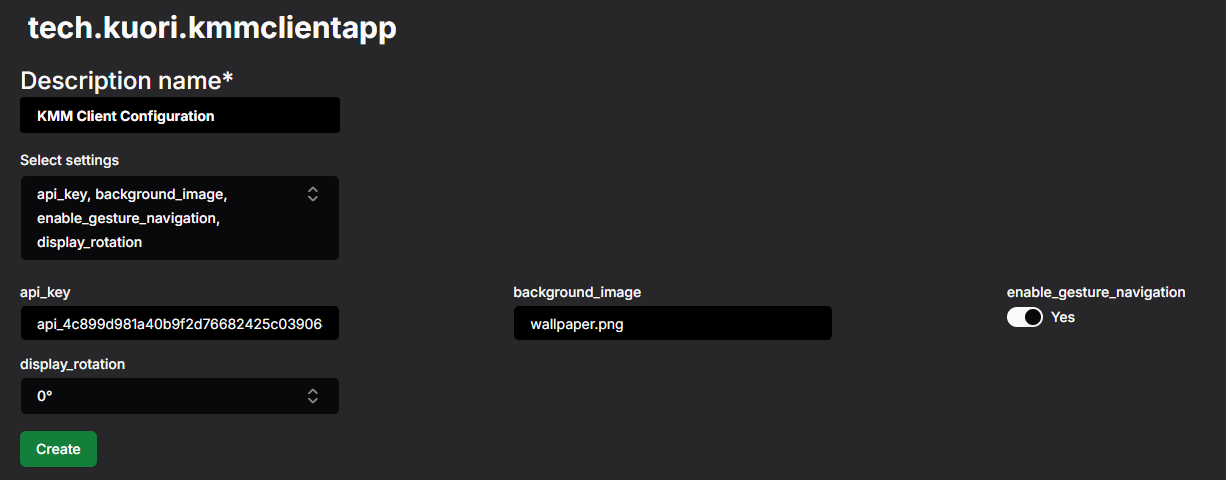
The Background Image needs a filename for the desired image. The image needs to be uploaded to the KMM first. To upload image, navigate to Files from the side navigation and click Upload File:

For background image the description is optional and destination folder is not needed. Destination folder is used for file upload to the device. More about file upload later in the Features Explained.

Features Explained
Server ping / Online status

Background image
Sets the background image shown on the device home screen. Choose an image that fits your device screens; the KMM Client applies it when the configuration is published to the device group. The image is set by the KMM Client together with its Security Service app, so both must be installed on the device.
Enable gesture navigation
Switches the device to gesture navigation instead of the three-button navigation bar. Its main purpose is to hide the taskbar when an application runs in kiosk mode, so the user sees only the kiosk app. Set it to **Yes** to hide the taskbar and **No** to keep the standard navigation bar. In the ready-made configuration this setting is **Yes**.
Display rotation
Fixes the orientation of the device screen. If the picture on the screen isn't oriented correctly from the start (for example, it's showing landscape content on a portrait-mounted totem, or it's simply upside down), you can fix this from the KMM client. The rotation setting only offers four fixed values — 0°, 90°, 180°, and 270° — so you just pick whichever of the four matches how the screen is physically mounted, and the display will reorient to match. It's not a fine-tune/free-angle adjustment, just one of those four positions.
Screen capture (screenshot)
Screenshot can be requested from Device page. Navigate to Devices from side navigation and open the desired device from the View button:

From the Commands tab you can find Request Screenshot button:

When requested, the button stays inactive until the screenshot is received from the Client:


Custom APK installation
KMM Client installs desired APKs from KMM. To add custom APK to device group, navigate to Applications → Application List from the side navigation and click upload APK:

Choose the APK file and click Upload.
Next you need to create Application Policy for the Custom APK. Navigate to Policies → Application from the side navigation and click create new:

Enter description name and choose the application from the dropdown:

When custom APK is chosen, the necessary settings are set by default. You can change the APK version code (if multiple versions of the same APK are uploaded to the KMM):

Now that Application Policy can be added to the Device Group. Navigate to Device Groups from the side navigation and click open the desired Device Group from the list:
Click Edit and choose the Application Policy from the Applications dropdown:
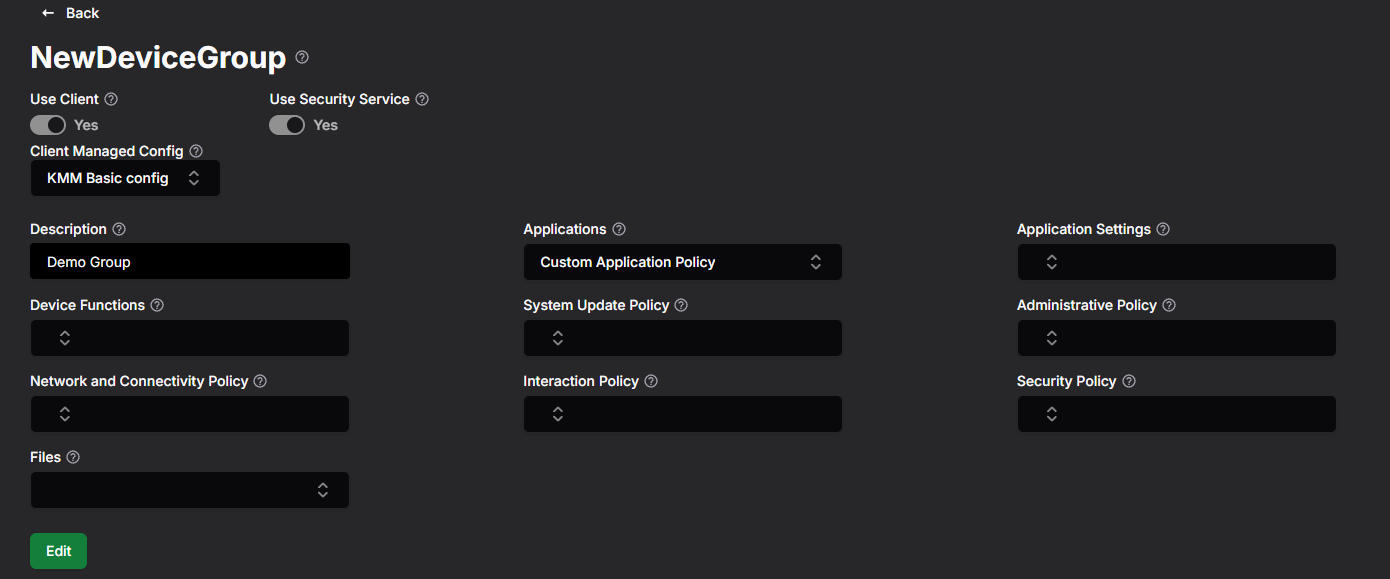
KMM Client installs the desired APKs assigned to its Device Group.
File upload
Upload files to specific locations on the device. First upload the desired files to KMM. Navigate to Files from the side navigation and click upload file:
Choose the file, and enter the description (optional). Destination folder offers Android’s default folders and also a Custom folder. If Destination Folder is not provided, the file will be downloaded to /Downloads:

Next add that file to the Device Group. Navigate to Device Groups from the side navigation, click open the desired Device Group from the list:
Click Edit and choose the file(s) from the Files dropdown:
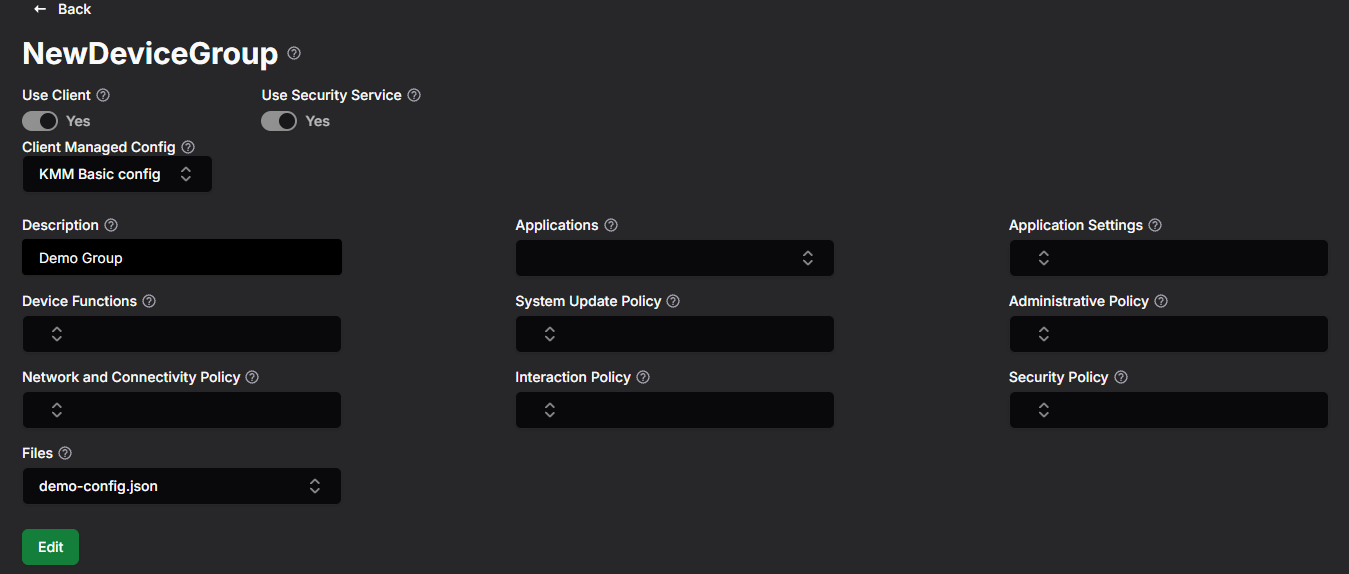
KMM Client downloads the desired files assigned to its Device Group.
Automatically wake DSM Client if installed on the device
KMM Client detects if DSM Client is installed and wakes it up via broadcast.
Application Management
To install app on your device, you need to add the application to your enterprise in KMM. After that you need to create Application Policy for that application. That policy needs to be then added to the Device Group your Device belongs to in order to install the application.
Install application on device

Select or search the desired application from Play Store and click ‘Select’:

Next the application needs Application Policy that can be added to the Device Group. Navigate to Policies → Application from the side navigation and click ‘Create new +’:
Enter description name for the policy and choose your application from the dropdown:
Default values are provided for the configuration with Install Type ‘Available’:

The Install Type can be changed on non-custom applications. Available means that the application can be freely installed from the Play Store on the device, but it is not installed automatically. Other options are:

ForceInstalled installs the application automatically when the policy is applied to the group that the device belongs to. The application can not be uninstalled manually from the device with this setting. RequiredForSetup installs the application automatically when the device is enrolled.
After the policy is created navigate to Device Groups from the side navigation and click open the desired group (or create a new one). Choose the policy from the Applications dropdown and save the group:

Install custom application on device
KMM Client installs desired APKs from KMM. To add custom APK to device group, navigate to Applications → Application List from the side navigation and click upload APK:
Choose the APK file from your device and click Upload:

Next you need to create Application Policy for the Custom APK. Navigate to Policies → Application from the side navigation and click create new:
Enter description name for the policy and choose your custom application from the dropdown:
When custom APK is chosen, the necessary settings are set by default. Install Type is locked to Custom for custom applications. You can change the APK version code (if multiple versions of the same APK are uploaded to the KMM):
Now that Application Policy can be added to the Device Group. Navigate to Device Groups from the side navigation and click open the desired Device Group from the list (or create a new one). Choose the policy from the Applications dropdown and save the group:

KMM Client installs the desired APKs assigned to its Device Group.
Custom APK to Kiosk
KMM Client installs desired APKs from KMM. To add custom APK with Kiosk mode to device group, first you need to navigate to Applications → Application List from the side navigation and click upload APK:
Choose the APK file from your device and click Upload:
Next you need to create Application Policy for the Custom APK. Navigate to Policies → Application from the side navigation and click create new:
Enter description name for the policy and choose your custom application from the dropdown:
When custom APK is chosen, choose Kiosk for the Role Type. Install Type is locked to Custom for custom applications. You can change the APK version code (if multiple versions of the same APK are uploaded to the KMM):

Now that Application Policy can be added to the Device Group. Navigate to Device Groups from the side navigation and click open the desired Device Group from the list (or create a new one). KMM Client is required for custom APK installs, so make sure Use Client is enabled with correct configuration. KMM Client installs the desired APKs assigned to its Device Group.
Choose the policy for the APK from the Applications dropdown and save the group:

Optionally, we can also create Interaction Policy for more Kiosk settings. Navigate to Policies → Interaction from the side navigation, and click Create:
Enter the description name and edit the desired settings. Here we can find Kiosk custom launcher enabled, Kiosk power button actions, Kiosk system error warnings, Kiosk system navigation, Kiosk status bar and Kiosk device settings. Save the policy when ready.

The Interaction Policy can be added to the Device Group the same way the Application Policy was added previously.
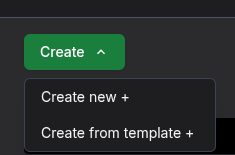
Lastly, we need Enrollment Token for the new group. Navigate to Enrollment Tokens from the side navigation, and click Create:
KMM automatically generates new group with “initial_” prefix for the groups that have KMM Client and Custom APK with Kiosk mode enabled. Choose that and click Save: