
Network and Connectivity Policy
A Network and Connectivity policy controls how the devices in a device group connect to the outside world:
-
whether Wi-Fi is on, and whether users may turn it off or change Wi-Fi networks
-
which Wi-Fi networks devices may or may not join, and how secure a network must be
-
tethering, USB data transfer, airplane mode, 2G and ultra-wideband radios
-
a global HTTP proxy
-
Wi-Fi networks that are pre-configured on the device, including their passwords
-
which device activity logs are collected and whether they may be uploaded over mobile data
You create the policy once and assign it to one or more device groups. Every device in those groups receives the same settings.
Before You Start
-
Most connectivity settings only work on company-owned devices. Several of them also need a minimum Android version — see Minimum Android version. A device that does not meet the requirement keeps its previous behaviour and is reported as non-compliant for that setting.
-
If you plan to pre-configure Wi-Fi networks, have the network name (SSID), security type and password at hand.
-
Be careful with settings that can cut a device off from the network (turning Wi-Fi off, a strict allowlist, an unreachable proxy). Turning on Escape Hatch Enabled gives users a way to reconnect if that happens.
Where to Find It
Open Policies in the left-hand menu and select Network and connectivity. The enterprise home page also has a Network and Connectivity card that leads to the same list.
The list shows every policy in the enterprise with its Display name, the Assigned Device Groups and the Min Android version it requires. Use the Name filter and Search to narrow the list, and the page controls above and below the table to move between pages.
How to Create a Policy
-
Open Policies → Network and connectivity.
-
Select Create, then Create new +. (To start from a saved template, select Create from template + instead — see Templates.)
-
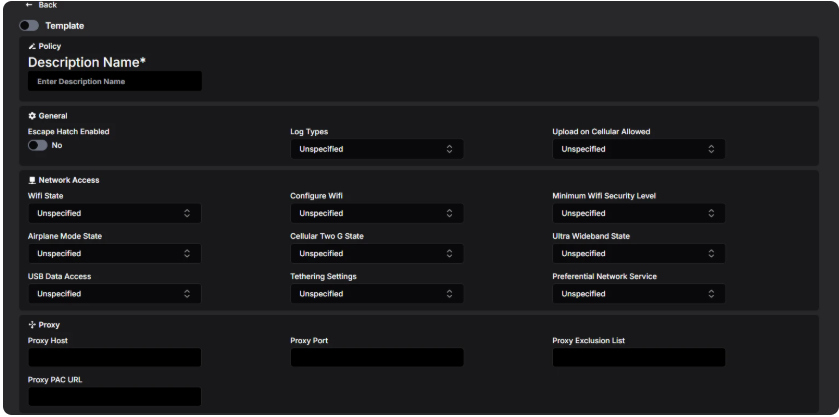
Enter a Description Name. This is required and must be unique within the enterprise.
-
Fill in the General, Network Access, Proxy and Wi-Fi Policies sections. Every dropdown starts as Unspecified, which means "do not manage this setting" — the device keeps its default behaviour. Only change the settings you actually want to enforce.
-
If devices should have Wi-Fi networks ready to use, add them under Network Configurations — see Network Configurations.
-
Select Save.
If something is wrong, an error message appears at the top of the page and the policy is not saved. See Troubleshooting for the most common messages.
What Happens Next?
The new policy appears in the list. It does nothing until you assign it to a device group — see Assigning the Policy to a Device Group.
Settings Reference
The option names below are exactly what the dropdowns show.
General
Setting
What it does
Escape Hatch Enabled
When Yes, a device that cannot reach any network when it starts up asks the user to connect to a network temporarily so it can fetch its latest policy. The temporary network is forgotten afterwards. Recommended for devices locked to a single app, where the user cannot otherwise reach the settings. Note: if Configure Wifi is set to DisallowConfiguringWifi, the escape hatch is shown regardless of this setting when the device has no network at start-up.
Log Types
Which activity logs the device collects. You can select both SecurityLogs (for example wrong password attempts, removable storage mounted) and NetworkActivityLogs (DNS lookups and network connections). Users see a notice on the device when logging is enabled. Security logs need Android 7 or later, network logs Android 8 or later; on company-owned devices with a work profile both need Android 12 or later and only cover the work profile.
Upload on Cellular Allowed
Which of the enabled log types may be uploaded over mobile data. By default logs wait until the device is on Wi-Fi.
Network Access
Setting
Options and effect
Wifi State
WifiStateUserChoice (default): the user may turn Wi-Fi on and off. WifiEnabled: Wi-Fi is on and cannot be turned off. WifiDisabled: Wi-Fi is off and cannot be turned on. Enabled/Disabled need company-owned devices on Android 13 or later.
Configure Wifi
AllowConfiguringWifi (default): the user may add, change and remove Wi-Fi networks. DisallowAddWifiConfig: the user can only switch between networks that already exist on the device (Android 13 or later). DisallowConfiguringWifi: the user cannot add, change or remove networks at all. On fully managed devices this also removes every network from the device except the ones listed under Network Configurations; on work profiles the existing networks stay but cannot be changed.
Minimum Wifi Security Level
The weakest network the device may join. OpenNetworkSecurity (default): any network, including open ones. PersonalNetworkSecurity: a password-protected network (WEP, WPA2-PSK) at minimum — no open networks. EnterpriseNetworkSecurity: enterprise (EAP) networks only. EnterpriseBit192NetworkSecurity: 192-bit enterprise networks only. Anything stricter than Open needs Android 13 or later.
Airplane Mode State
AirplaneModeUserChoice (default): the user may toggle airplane mode. AirplaneModeDisabled: airplane mode is off and cannot be turned on (Android 9 or later).
Cellular Two G State
CellularTwoGUserChoice (default): the user may toggle 2G. CellularTwoGDisabled: 2G is off and cannot be turned on from settings (Android 14 or later).
Ultra Wideband State
UltraWidebandUserChoice (default): the user may toggle ultra-wideband. UltraWidebandDisabled: ultra-wideband is off and cannot be turned on from settings (Android 14 or later).
USB Data Access
Controls data over the USB port; charging is never affected. AllowUsbDataTransfer: everything allowed. DisallowUsbFileTransfer (default when Unspecified): file transfer is blocked, but accessories such as a mouse or keyboard still work. DisallowUsbDataTransfer: all USB data is blocked (Android 12 or later with suitable hardware; older or incompatible devices fall back to blocking file transfer only). Company-owned devices only.
Tethering Settings
AllowAllTethering (default): all forms of tethering and hotspot are allowed. DisallowWifiTethering: Wi-Fi hotspot is blocked, other tethering allowed (company-owned devices on Android 13 or later). DisallowAllTethering: no tethering of any kind.
Preferential Network Service
Whether work traffic uses a network service dedicated to enterprise use, such as an enterprise slice on a 5G network, when your carrier provides one. PreferentialNetworkServiceDisabled is the default. PreferentialNetworkServiceEnabled needs a work profile on Android 12 or later, or a fully managed device on Android 13 or later.
Proxy
A device-wide HTTP proxy recommendation. Leave all four fields empty if you do not use a proxy.
Setting
What to enter
Proxy Host
Host name or address of the proxy server.
Proxy Port
Port of the proxy server.
Proxy Exclusion List
Hosts that bypass the proxy, separated by commas. Wildcards such as *.example.com are allowed.
Proxy PAC URL
Address of a PAC (proxy auto-configuration) script.
Use either the direct proxy fields (Host, Port, Exclusion List) or the PAC URL, never both — the policy cannot be saved otherwise.
Keep in mind that the proxy is a recommendation: some apps ignore it, and if the proxy cannot be reached the device may lose network access.
Wi-Fi Policies
This section restricts which Wi-Fi networks a device may connect to. It does not change which networks are stored on the device — use Configure Wifi for that.
Setting
Options and effect
Setting
Options and effect
Wifi SSID Policy Type
Unspecified: no restriction — the SSID list must be left empty. WifiSsidDenylist: the device may join any network except the ones listed. WifiSsidAllowlist: the device may join only the listed networks — the list must contain at least one name.
Wifi SSIDs
The network names the rule applies to. Type a name and press Enter or , to add it; select × on a name to remove it. Any non-empty list needs a company-owned device on Android 13 or later.
Wifi Direct Settings
AllowWifiDirect (default) or DisallowWifiDirect, which stops the user from using Wi-Fi Direct (company-owned devices on Android 13 or later).
Network Configurations
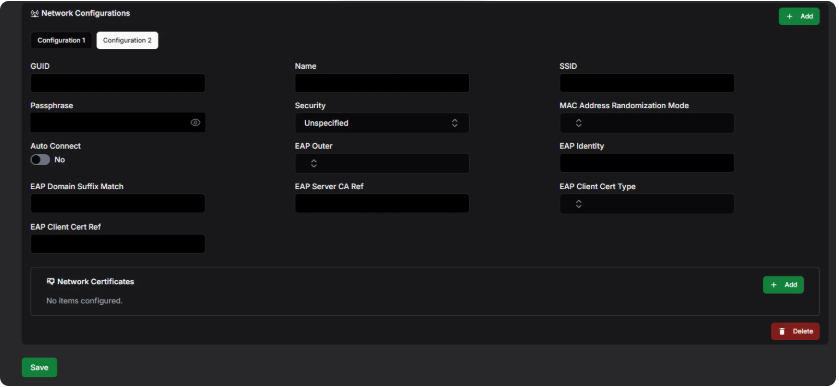
Each entry is a Wi-Fi network that the device knows about without the user having to enter anything. The network is pushed to the device together with its password.
-
Select Add in the Network Configurations section. A new tab (Configuration 1, Configuration 2, …) appears; the tab takes the network's Name once you enter one.
-
Fill in the fields below.
-
To remove the configuration shown, select Delete at the bottom right of the section.
Field
What to enter
GUID
An identifier you choose for this network. It must be unique within the policy; certificates refer to it.
Name
A display name for the network.
SSID
The network name exactly as the access point broadcasts it.
Passphrase
The network password. Required for WepPsk, WpaPsk and Wep8021x; must be left empty for Unspecified, WpaEap and Wpa3Enterprise192. A WEP key must be exactly 10 or 26 characters. Select the eye icon to show what you typed. After saving, the password is stored securely and only shown as ********.
Security
Unspecified: an open network with no password. WepPsk, WpaPsk: a personal network with a shared password. WpaEap, Wep8021x, Wpa3Enterprise192: enterprise networks that authenticate with certificates — see the note below.
MAC Address Randomization Mode
Hardware: the device uses its factory MAC address. Automatic: the device decides. Leave empty to keep the device default. Android 13 or later.
Auto Connect
Yes: the device joins the network automatically when in range. No: the user must pick the network once before it connects automatically.
EAP Outer, EAP Identity, EAP Domain Suffix Match, EAP Server CA Ref, EAP Client Cert Type, EAP Client Cert Ref
Enterprise (EAP) authentication details. For WpaEap and Wpa3Enterprise192 all six are required together with at least one certificate. EAP Domain Suffix Match takes one or more domain suffixes separated by commas, each containing a dot (for example corp.example.com); Wpa3Enterprise192 always needs one. EAP Server CA Ref and EAP Client Cert Ref are the GUIDs of certificates you add under Network Certificates. EAP Client Cert Type is Ref (a certificate in this policy) or KeyPairAlias (a key pair already installed on the device, Android 12 or later).
Enterprise Wi-Fi is not yet delivered to devices. The EAP fields and certificates are validated and saved with the policy, but the current release does not push them to devices, so an enterprise (EAP) network configured here will not connect. Personal (password) and open networks work normally.
Network Certificates
Certificates belong to a network configuration and are added inside it. Select Add in the Network Certificates box, fill in the fields, and select Delete to remove the selected certificate.
Field
What to enter
Description
A name for the certificate, at least 3 characters.
GUID
An identifier you choose. Use it in EAP Server CA Ref or EAP Client Cert Ref.
Type
Cert
The certificate data.
Format
X509 for a certificate without a private key, Pkcs12 for a client certificate bundled with its key.
Viewing and Editing a Policy
-
In the policy list, select the eye button on the row you want to open.
-
If the policy is in use, Assigned to: at the top lists the device groups; each name is a link to that group.
-
Select Edit.
-
Change the settings. Select Save to keep the changes or Cancel to discard them.
Notes on editing:
-
Existing network configurations cannot be changed. To alter a network, delete its configuration and add a new one with the new values. Certificates can only be added to or removed from a new configuration.
-
The saved password of an existing configuration is never shown again.
-
Devices receive the updated settings through the device groups the policy is assigned to.
Copying a Policy
Copying is the quickest way to create a variant of an existing policy.
-
Select the copy button — either on the row in the list or at the bottom of an open policy.
-
In Enter display name for new copy, type a name of at least 3 characters.
-
Select Copy.
The copy contains every setting, network configuration and certificate of the original. When you copy from an open policy, the copy is opened for you.
Templates
A template is a policy saved for reuse; it is not assigned to devices itself.
Saving a template (Admin or Editor role only):
-
Open Create → Create new +.
-
Turn on the Template switch above the form.
-
Fill in the settings and select Save.
Creating a policy from a template:
-
Open Create → Create from template +.
-
In Select a Template, select Create + next to the template you want.
-
The form opens pre-filled. Enter a Description Name, adjust the settings and select Save.
Admins can remove a template with the trash button in the same dialog.
Deleting a Policy
-
In the policy list, select the trash button on the row.
-
Confirm with Delete in the Confirm deletion dialog.
A policy that is still assigned to a device group cannot be deleted. Remove it from the group first.
Assigning the Policy to a Device Group
-
Open Device Groups and create a group or open an existing one.
-
In Network and Connectivity Policy, select the policy.
-
Save the group.
A device group can have one Network and Connectivity policy; a policy can be used by any number of groups. The Network and Connectivity column in the device group list shows which policy each group uses.
Minimum Android Version
Each policy shows a Min Android value in the list. It is calculated from the strictest option you selected and tells you the oldest Android version a device needs in order to apply everything in the policy. Devices running an older version keep their previous behavior for the settings they do not support.
| Selection | Requires Android |
| Nothing beyond the defaults | 6 |
| Airplane Mode State = AirplaneModeDisabled | 9 |
| USB Data Access = DisallowUsbDataTransfer | 12 |
| Wifi State = WifiEnabled or WifiDisabled | 13 |
| Configure Wifi = DisallowAddWifiConfig | 13 |
| Minimum Wifi Security Level stricter than Open | 13 |
| Tethering Settings = DisallowWifiTethering | 13 |
| Wifi Direct Settings = DisallowWifiDirect | 13 |
| Any Wifi SSIDs listed | 13 |
| Cellular Two G State = CellularTwoGDisabled | 14 |
| Ultra Wideband State = UltraWidebandDisabled | 14 |